The Payment Schedule is a list of Schedule Items (also known as payment items) for your project which form the basis of payment under the contract. The Payment Schedule will generally consist of headings, which contain only a description, and line items which include a description, the quantity you expect to build of that item (Schedule Qty), the unit of measure and how much you expect to be paid for each unit of that quantity. The Payment Schedule is necessary in Civil Pro to record quantities against lots, and to prepare Progress Claims.
The schedule item register is accessed from:
- Version 8 – the Payment section of the Main Menu – Payment=>Schedule Items
- Version 9 & 10 – the Financials Setup section of the Main Menu – Financials Setup=>Schedule Items
Civil Pro’s schedule can be structured – i.e. it can be represented as a hierarchy or tree. This is very useful for subtotaling, summarising and data presentation in both the schedule itself and in Progress Claims.
Contents
Adding, editing and deleting
Adding
There are 2 ways to create a Schedule in Civil Pro:
- You can enter your schedule line by line. To do this, Enable Editing and click on a new row in the Register Grid. Enter the required information into each column. If you need to insert a new item into the Schedule at a position other than the end of the schedule, access the Insert Item (above) and Insert Item (below) options from the Context Menu. An item is considered to be a heading if it has no quantity and schedule rate.
- As the construction schedule is generally available electronically it can be imported from a CSV. To import a schedule from a CSV, select the Import/Export=>Import Schedule option from the Grid Context Menu (accessed by right clicking on the main part of the grid). Refer to the section on Importing Data. The option Import/Export=>Import Schedule (as child) is described further on in this help topic.
If you have imported your Schedule Items, there is a fair chance that some work needs to be done to make your schedule look its best. There are several Civil Pro functions to assist with this. Read the section below on the Schedule Manipulation functions available from the Context Menu.
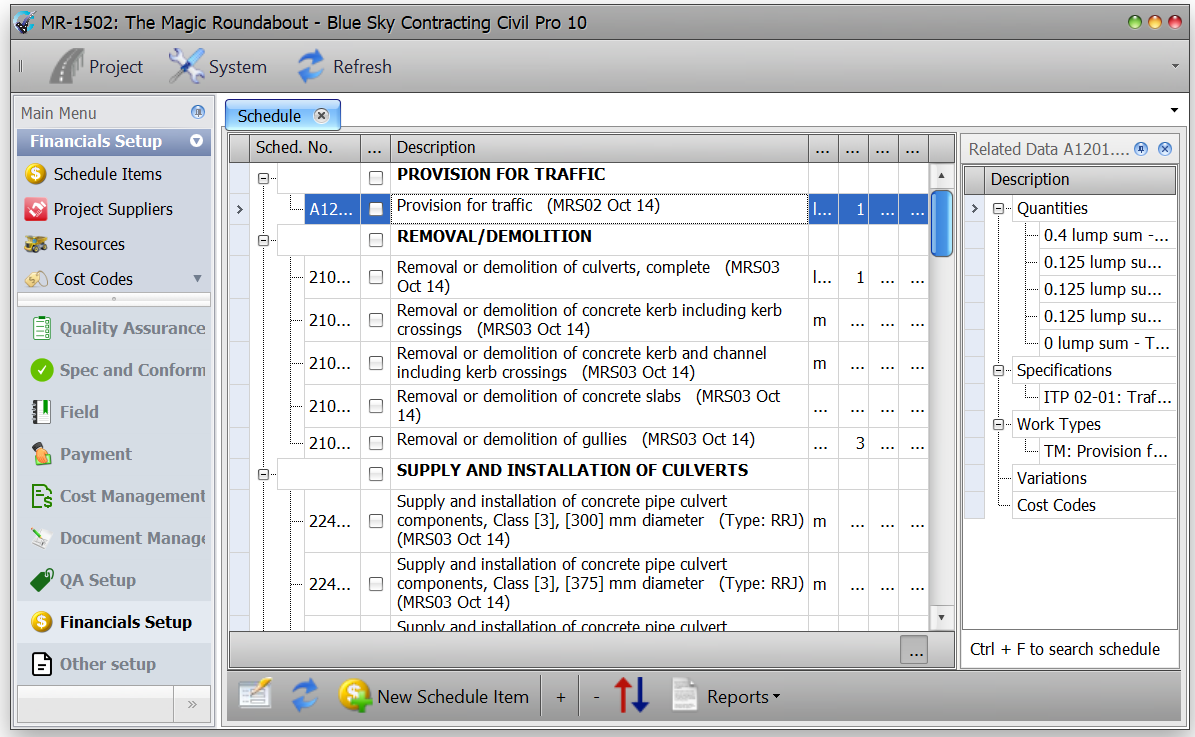
The screenshot below shows a Schedule which is formatted using the Schedule Manipulation function and has been structured.
Editing
You can edit items directly in the grid by Enabling Editing. Alternatively, schedule items can be edited in the Detail Panel. If the Detail Panel is not visible, double click on any Schedule Item or use the Show Schedule Detail option from the Context Menu.
Deleting
To delete a schedule item, Enabling Editing, select the record(s) to delete, and press the delete key.
Related Items
You can link Work Types, Specifications (ITPs), Cost Codes and Variations to any Schedule Item. The Related Items Panel also shows lot quantities registered against each Schedule Item, but these cannot be added from the Schedule Register, only the Lot Register.
To add a link from a Schedule Item to a Work Type, Specification or Variation, double click the relevant heading in the list and then drag and drop (or double click) one or more items to link onto the heading that was clicked. Refer to the Adding, Updating and Deleting help topic for more information on Related Items generally.
Adding a link between a Work Type and Schedule Item allows Civil Pro to automatically filter the Schedule Item list when adding quantities to a lot. By default the list will show only those items relevant to that lot’s Work Type. Similarly, for Specification links when adding a Checklist.
The link between Variations and Schedule Items is used when a specific Schedule Item is used as the method of payment for Variation.
Allocating schedule items to cost codes
If you are using Civil Pro’s forecasting functions, then it is necessary to assign cost codes to each schedule item. There are essentially 2 ways that cost codes are created and allocated.
- Direct relationship 1:1 with each schedule item allocated 100% to a matching costcode
- Cost codes aggregate schedule items with part or all of multiple schedule items allocated to each cost code
Civil Pro supports both of these options.
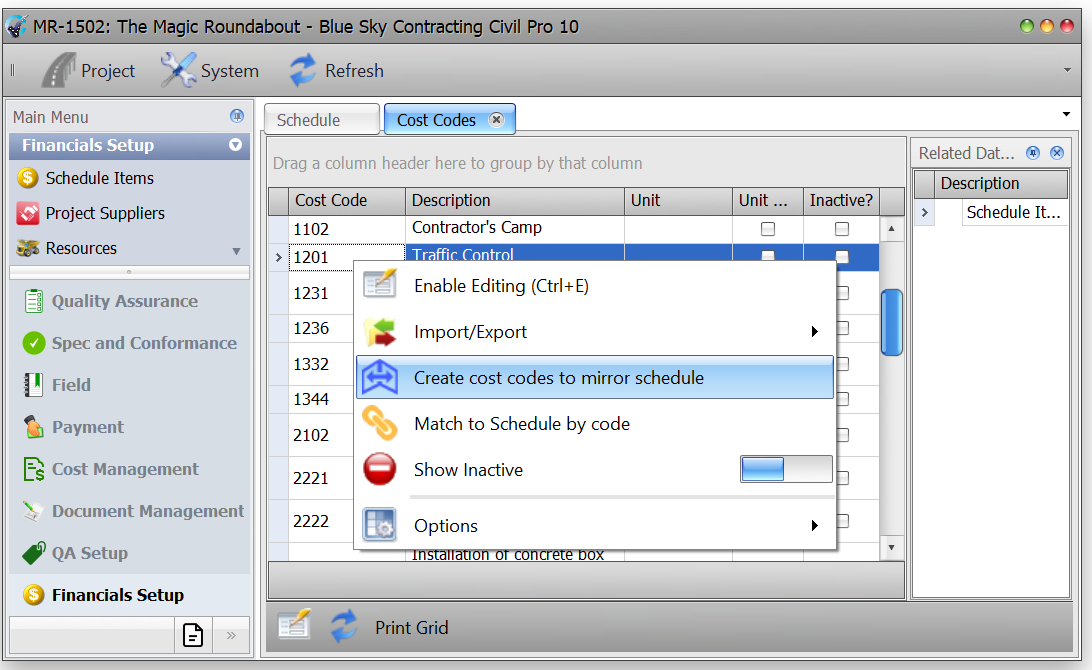
Method 1: Direct 1:1 relationship
In this case, there is no need to create cost codes. Simply open the cost code register and use the Create Cost Codes to Mirror Schedule function from the context menu. This will create a cost code fore every non-heading schedule item and assign 100% of that item to the cost code. Your allocation is complete.
Method 2: many:many allocations
In this case, distribution is performed manually and can be performed either from the Schedule Register (recommended) or the Cost Code Register. To start distributing schedule items, double click on the cost code heading in the related items panel. The cost code distribution dialog will be shown
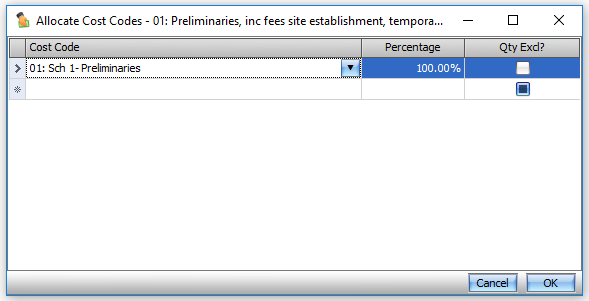
Simply select the cost codes the schedule item is distributed to, and allocate a percentage. The data can only be saved if there are no allocations, or 100% of the allocation is distributed. In the above screenshot, the schedule item is 100% allocated to a matching cost code.
The Qty Excl? field is used in the forecasting module for cost codes that automatically calculate a quantity by summing the quantities of schedule items allocated to it. If you set that option for a costcode in the forecast module, the using the Qty Excl? tag will prevent this specific schedule item contributing to the quantity. This is useful where you have a LS schedule item (Qty=1) in a costcode that has items with schedule-of-rates quantities – such as Supply and Install Pipe, 22m.
Creating schedule item to work type/ITP relationships using a template
Often you will undertake projects with the same or similar Schedule Items, Work Type codes and Specifications. In these cases it is possible to automatically create the links between the registers. In order to do this, you will need a CSV file which has at least 2 columns:
- the Schedule Item number, and
- the ITP Doc No. and/or the Work Type
This is most easily created by manually building the relationships in Civil Pro for the first project, and then exporting the data.
Exporting schedule relationships
To export schedule relationships:
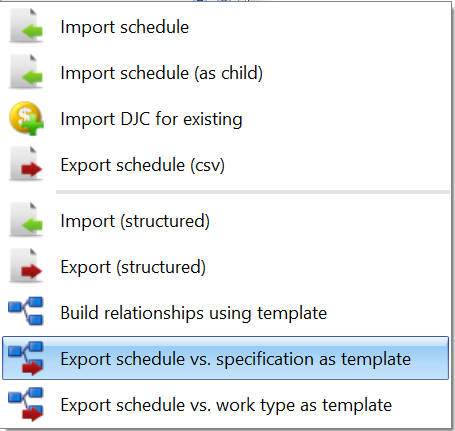
- From the Context Menu select either Import/Export => Export Schedule vs. Specification as Template or Import/Export => Export schedule vs. Work Type as Template from the Context Menu.
- Enter a file name for the exported file.
Creating relationships for the current project
You can create the relationships using a CSV (or equivalent copied to the clipboard) which contains:
- a list of Schedule Item numbers in the first column
- a list of Specifications or a list of Work Types in the second column
Alternatively, you can have it all in 1 file.
To import the data:
- From the Context Menu select Import/Export => Build Relationships Using Template.
- Select either Data => Get Data from File or Data=> Get Data from Clipboard from the Register Menu of the Link: Schedule items | Specifications page.
- The data will be shown in the Link: Schedule items | specifications page
- Assign headings for the Schedule Number* and the Work Type* and/or the ITP Doc Number* – refer to the Importing topic for information on setting headings.
- Click the Preview button.
- If the preview looks right, click the Apply button.
TIP: As an alternative to the Schedule number, ITP Doc No. and Work Type you can use an ITP Description, Work Type Description and/or Schedule Description which provides looser matching – this can be advantageous when trying to match from a project where:
- the codes / schedule numbers are slightly different – however this is also more prone to error
- the Schedule Item match is fuzzy – the match does not have to be exact, but the Schedule number in the template must be contained within the project’s Schedule number

Schedule formatting using the Schedule Manipulation functions
When you import a Schedule from a file, it will most likely need at least some work to make it look its best. Civil Pro provides several Schedule Manipulation tools to assist with this.
Define Headings
Civil Pro shows headings in the Schedule using different formatting. It identifies headings as those Schedule Items that have no quantity and/or rate. When your Schedule is imported, rows you want as headings may not show up as such. This may be because there are zeros or non-visible characters in the cell that were imported with the data.
To help with this, Civil Pro has a wizard available by selecting Schedule Operations=> Define Headings from the Context Menu.

The Schedule Heading Wizard is a single page form (above). Select how you want to define headings by selecting or deselecting either of the 2 check boxes at the top. Selecting both will require that an item in the Schedule has a zero or nothing in both the quantity and rate columns.
The third check box defines whether Civil Pro subtotals child items of the heading when printing reports. The depth of the hierarchy for which subtotaling occurs is controlled by entering a value in the Limit totals to levels above: text box, which is only accessible when the Create subtotals for headings option is selected. Please note that the subtotal headings can be added independently of the heading definitions – simply run this function again and do not select any criteria for assigning header rows.
Prepend characters and strip leading characters
You may want to prepend/strip characters from a set of Schedule Items to easily differentiate them from similar items. For example, if you have different sections (Sections A, B, C and D) which have similar works and therefore similar or the same schedule item numbers, you can easily prepend the relevant section to the start of the schedule number. You may select all of the schedule Items in Schedule A and use the Prepend characters function to add “A-“ to the front of the Schedule Item number – so “33100” becomes “A-33100”.
To prepend to the start of a collection of schedule items:
- Select the items you wish to prepend.
- Choose Schedule Operations => Prepend Characters from the Context Menu.
- You will be prompted to enter the character to prepend. Type in a character and check/uncheck the box to mark whether subitems will also be altered. Then click OK
- Where the specified Schedule Items have Schedule numbers, these will be updated to be preceded by the specified character(s).
Stripping characters does exactly the reverse and can be used to undo if you make a mistake.
Creating structure
By default, the Schedule structure in Civil Pro is locked. This is to prevent users inadvertently reordering their Schedule by a careless drag and drop. To unlock the Schedule so you can work with the structure, click the Unlock Schedule button in the Context Menu. Click it again to lock it.
To create levels, select one or more of the child rows and drag them over the parent row, waiting for the blue arrow. This will put the rows you dropped a level lower than the parent you dragged them onto and allow you to expand or collapse them. There is no limit to the number of levels you can create, though you probably want to keep it to 4 or less for report formatting reasons.
Alternatively, you can select a group of Schedule Items and indent/outdent using CTRL +[left arrow] or CTRL +[right arrow]. This will set the selected items as children of the node above (right arrow) or, drop them down a level (left arrow).
Subtotals
If you have created structure for your Schedule, you can subtotal any parent Schedule Item simply by selecting the Total? checkbox in the second column (enable editing first). You can apply subtotals to as many sections as you like, at any level.
Reordering schedule items
Reordering rows is the same process as described for drag and drop in the Creating Structure topic, except when you drag over the parent row, hover over the top or bottom edge of the target row until you get a yellow arrow. This indicates the item will be dropped above or below the item instead of as a child.
Please note that drag and drop and reordering is disabled when the Schedule Register is first opened. To enable it click the Unlock Schedule button in the Context Menu.
TIP: To restore original structure click on the ↑↓ button in the Register Menu.