Contents
Test Requests Register
The Test Request Register is used to track any testing associated with a Lot, and to communicate this testing to testing authorities and the client. The Test Request Register is accessed from the Quality Assurance section of the Main Menu. Users can also record and report on test results.
Test Requests are linked to Lots, Tests and Test Properties when each record is created. Requests can also be linked to documents at any time.
Test Request Fields
Several fields describe the test request, its progress, and when key events have occurred:
- Test Request Number– the sequential unique identifier for an TR. Generated when an TR is first created
- Description – a text field describing what is to be tested
- Lot– the Lot to be tested under the TR
- Requested By – the user who created the TR (automatically assigned)
- Date Requested – the date the TR was created (automatically assigned)
- Request To – the person to whom the TR is addressed
- Raised By – the user who created the Lot record (automatically assigned)
- Date Required – the date testing is required
- Time Required – the time testing is required
- Source – the source of material being tested
- Location Method – how the locations to be tested are selected – either Random Stratified Sampling (calculated by Civil Pro), Tester Selects or Specified
- Chainage Start; Chainage End; Left/Right Offsets – these parameters define a Lot’s geometry when Chainage Geometry is selected for the Test Request (refer to the Lot Register for more information about Geometry Types)
- Depth to Test – a measurement of the thickness of material to be tested
- Level Datum– a text field defining the vertical position of the material to be tested. This can either be a numeric datum, or a text descriptor such as SG, subgrade, natural surface etc
- TR Area, Volume, Length – fields calculated by Civil Pro based on the Lot Geometry where such a calculation is possible. These properties can be manually overridden (AVL Override)
- Notes – a text field for providing addition information about a TR
- Date Test Completed – the date the test has been finished
Adding a new test request
To create a new Test Request, click on the New Test Request button in the Ribbon or Register Menu. This will start the New Test Request Wizard. As with all Civil Pro forms, only the coloured fields are compulsory.
The new TR wizard
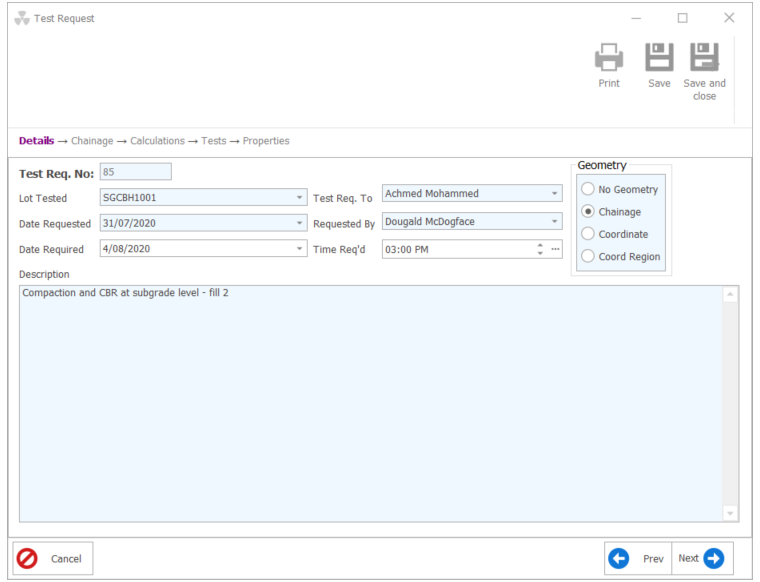
- When the New Test Request Wizard starts, you will be prompted to specify the Lot Tested, Date Requested, Date and Time Required, Description and the person the Test Request is addressed to. Once you select the Lot Tested, any geometry for the Lot will be copied in to the Test Request. For more information about specifying geometry refer to the Lot Register topic, the information is analogous to the geometry for Test Requests. Enter the data and click Next.
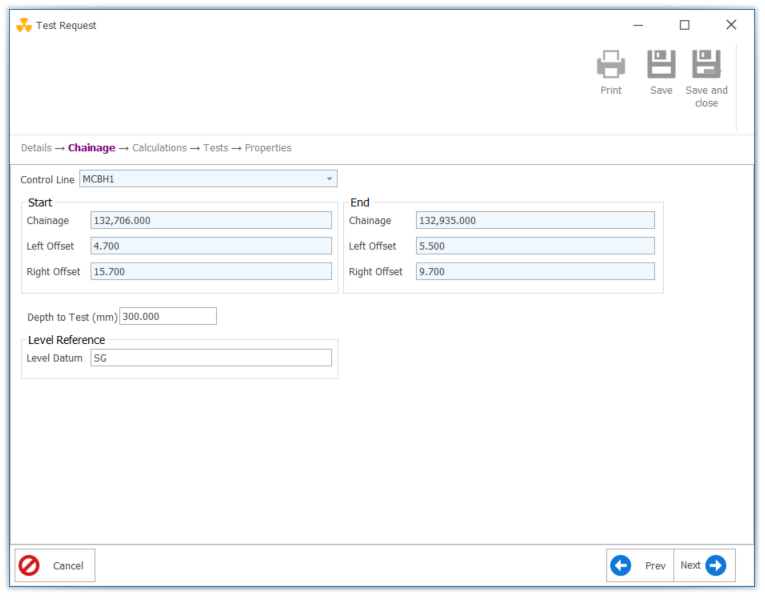
- The next screen specifies the Test Request Geometry. The Geometry for the previously selected Lot will be displayed. Make any necessary updates and click Next.
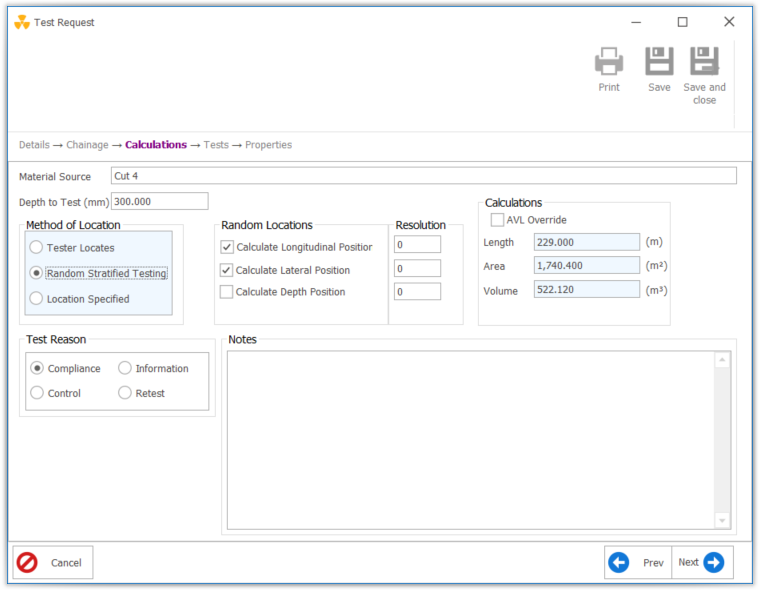
- If you have selected a Lot with geometry and you are inheriting that geometry, you may receive a prompt advising there is already Area/Volume/Length information for the Test Request. This is because the Test Request has inherited these values from the Lot, along with all of the geometry. If you want to keep the Area/Volume/Length information as per the Lot, click No. In this screen, optionally specify the material source, depth to test and add any notes. Also update the method of location and test reason. If you specify Random Stratified Testing, then the Random Locations Selector and Resolution Selector will be enabled. Select the dimensions you wish to calculate random stratification for, and the resolution. A resolution of 0 calculates to the nearest integer, 1 to the nearest 1/10th, 2 to the nearest 100th etc. Click Next.
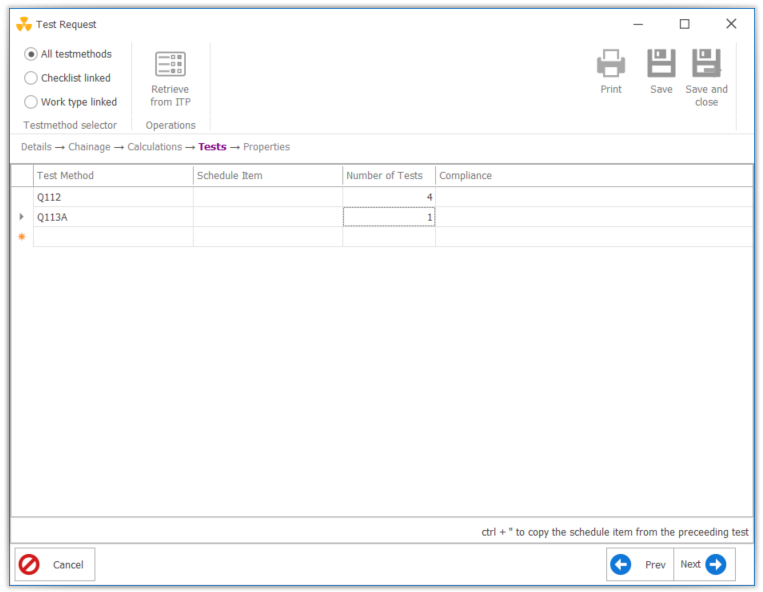
- Select the tests you wish to register against the Test Request. You can optionally specify the Schedule item being tested. The number of tests is required. You can specify as many different types of tests as you need. Click Next. Note: The Test Method list is filtered by default if Schedule | Specification links exist. This filter is based on the assigned Lot and its attached Checklists, listing only Test Methods linked to the Lot through the Specifications. To change the filter, click CTRL+T. The current filter and a reminder of the shortcut are shown in green above the test list.
- The next page of the Wizard displays each test to be taken and, if Stratified Sampling was specified, the Random Stratified Location for the test. You will notice in the below screenshot (click to enlarge) that the first and last entries are in the same location. This is because Civil Pro is able to identify that different test types are generally undertaken from the one sampling location to reduce the overall disturbance to the work. Click Next.
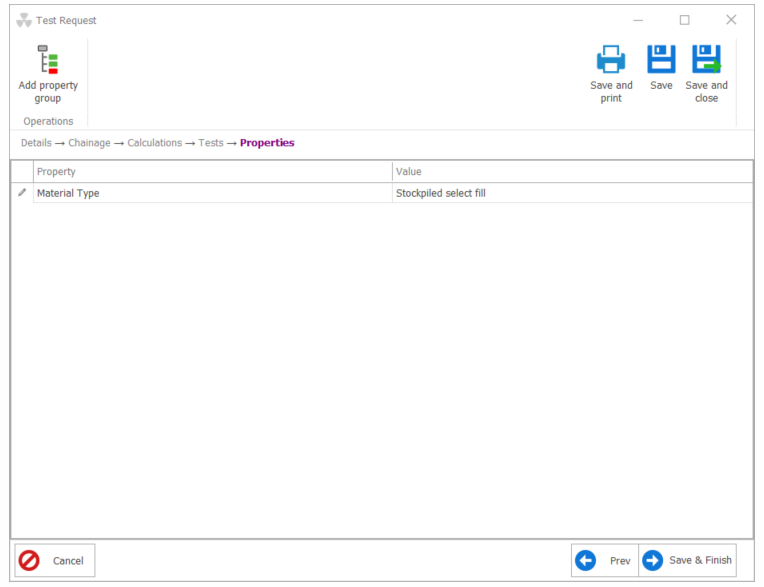
- The last data entry page enables the addition of Test Properties. You can either add Test Properties manually directly into the list, or assign a Test Property Group by selecting it in the Lookup and clicking the Add Properties button. Click Next.
- Review the summary and either click Finish to complete, or select the page heading n in the top left to return to previous pages.
Retrieving a test from the ITP
Instead of search the dropdown of all available tests you can use the Retieve from ITP option accessed from the Tests page Ribbon Menu. This function prompts you to select the test/s for the current Test Request from the checklists attached to the lot being tested.
Updating a test request
To update an Test Request:
- Enable Editing using the button at the left end of the Register Menu, or use the Context Menu option to do the same. Then directly update data in the grid.
- Update any field directly in the Detail dialog. If the Detail dialog is not visible, double click any record to show it.
Updating the test request number
If you need to edit the Test Request Number:
- Select the Test Request you wish to edit from the register
- Select the Edit Test Request Number button from the Ribbon Menu under the Operations heading.
- Edit the TR number to the desired, unique TR number.
Note: You can also update the Test Request number from within the Test Request detail dialog. Double click on the TR you wish to edit from the register. This will open the details screen. From within this screen right click on the white area to bring up the Context Menu and select Edit Test Request No.
Deleting a Test Request
To delete a record:
- Enable Editing and select the record to delete.
- Press the delete key.
Related Items
Test Requests are linked to Tests and Test Properties when the Test Request is created. You cannot modify these links using the Related Items Panel. Refer to the Updating a Test Request section above for information on how to change these records.
Test Requests can also be linked to Filestore Docs. Linking to Filestore Doc for a Test Request works in exactly the same way as for the Lot Register. Refer to the Lot Register topic for details.
Test Results
The Test Results are used to record testing outcomes from any of the Test Requests you complete. To record test results, you must have set up your Test Methods with Test Result fields so Civil Pro knows what results to expect.
Adding/Viewing results
- From the Test Request Register select the test requests that the results are for.
- In the Ribbon Menu under the Operaitons heading click on Show Results for Selected.
Results by single Test Request
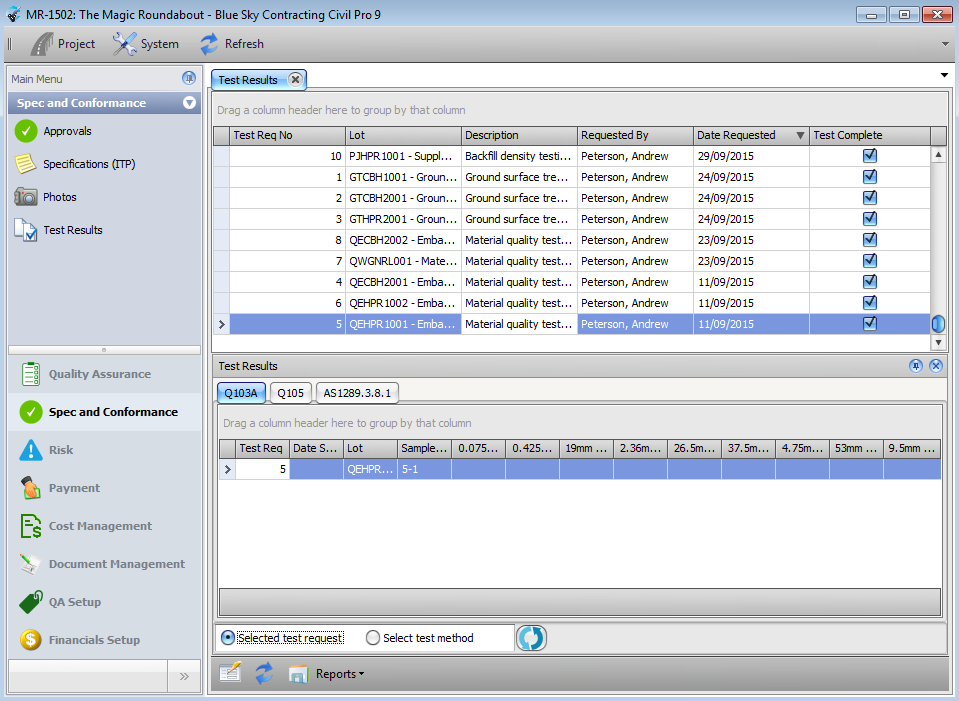
When the Test Result screen is first opened it will display in single Test Request mode.
- For each Test Request, a new tab in the Test Results Pane will be displayed for each different type of Test Requested in the TR.
- For each test, a column is created for the TR Number, Date Sampled, Lot, and Sample Number. Additional columns are added for each of the Test Result fields for the Test Method (as defined in the Test Method Register).
In the below screenshot, the selected Test Request (TR 5) has tests for 3 different Test Methods – Q103A, Q105 and AS1289.3.8.1. To enter the results for each test, simply Enable Editing and enter them directly into the grid.
Results for a single test method
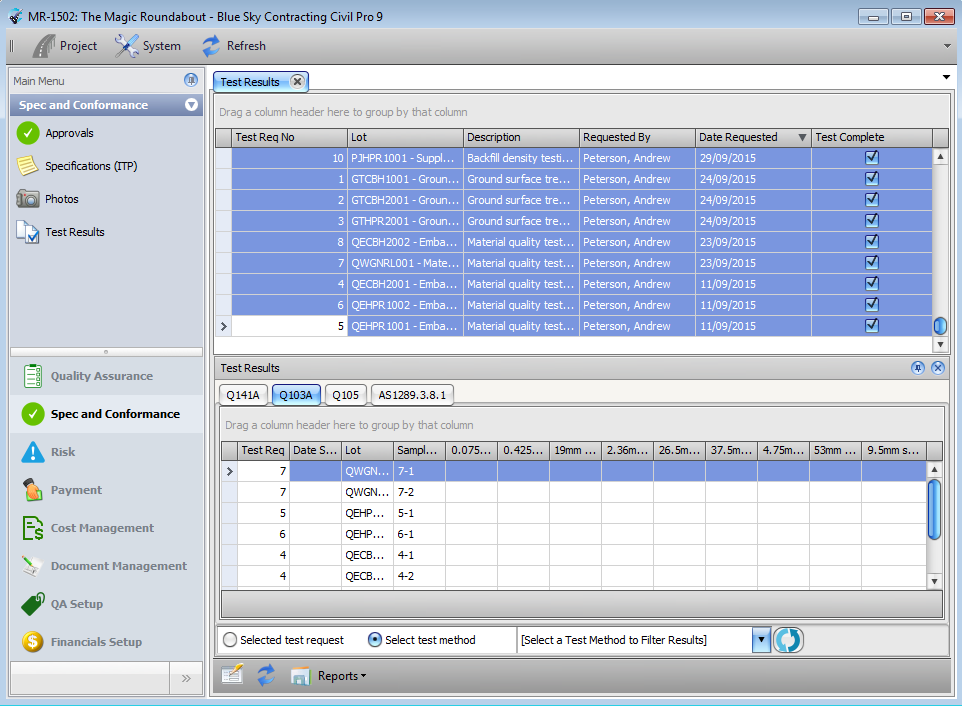
When the mode is changed to Single Test Method mode, an additional selector is visible. The Results screen will not show results in Single Test Method mode until a Test Method is selected. In this mode:
- Results for only a Single Test Method are displayed.
- When multiple Test Requests are selected in the Test Result top Register Grid, all tests of the selected type for any of the selected Test Requests will be displayed in the Results Grid.
In the below screenshot every Test Request has been selected. The Test Result Grid therefore shows every test in the system which is of type Q103A.
Result reporting
Test results report
Civil Pro provides a standard report which will show the tests currently visible in the Test Results dialog.
When results for a single test request are shown, the report will display the results for each Test Method on that request, including the average result, lower characteristic value (CV) and upper CV.
When in Single Test Method mode, the results for all currently selected Test Requests of that test type will be displayed. Average and CV will be calculated across all results.
Concrete results report
In addition to the standard reports which show the test results for the selected Test Requests, Civil Pro provides a special report for calculating the values required under the Concrete Reporting Specification for Queensland Transport and Main Roads contracts. To perform these calculations:
- In the Test Method Register – ensure there is a Test Method Type for the concrete testing (such as Q455B – Compressive strength of concrete).
- In the Test Method Register – check that the necessary result fields have been added – there should be at least 2 result fields (for cylinder A and cylinder B), but probably 3 to account for the situation when 3 cylinders are taken.
- In the Test Result dilog, change to Single Test Method mode and select the Test Method (such as Q455B – Compressive strength of concrete).
- Select at least one test request which has tests of this type and click the Refresh button next to the Test Method selector.
- Select Concrete Results from the Test Results dialog Ribbon Menu.
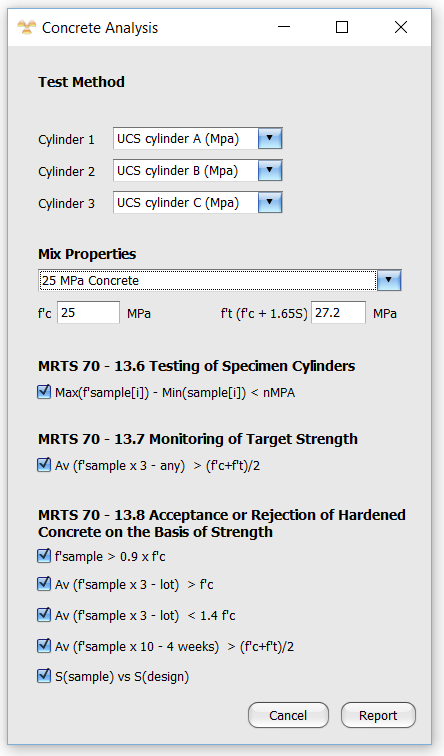
- In the Concrete Analysis popup, Civil Pro will assign the result fields for the Test Method to Cylinder 1, Cylinder 2 and Cylinder 3. Check these are accurate.
- Either directly enter values for f’c and f’t, or select a Test Property Group from the list in which these values are defined. In the example screenshot, the user has selected the 25MPa Concrete Test Property Group which has test properties f’c and f’t with default values of 25 and 27.2 respectively. These have been automatically imported by Civil Pro to populate the f’c and f’t fields in the Concrete Analysis Report builder.
- Select which analyses to include in the report.
- Click the Report button.