NOTE: The information in this topic is specific to version 11. For earlier versions, refer to the approval section in the V10 documentation.
The approval system is used to record confirmation that a checklist item, NCR or Purchase Order has been reviewed and its suitability agreed (or otherwise). When such an approval is required, the user generates an Approval Request which is emailed to the approver and published for their action in the mobile site. As the approver and requester interact with the approval it progresses through a workflow until the approval is completed. It is also possible to generate independent approvals, which are a replacement for the pre-V11 Authority to Proceed.
Contents
Overview
Each project has one or more workflows for each workflow category. These are defined in the Approval Workflows register. Workflows are avilable for the following categories
- Hold Points (Checklists)
- Witness Points (Checklists)
- Check Items (Checklists)
- NCRs
- Purchase Orders
- Independent
A workflow consists of a series of steps (statuses) connected by actions. For example, lets look at how a version 10 Hold Point approval looks when displayed as in the new Version 11 workflow. The version 10 style basic approvals are created when you build a new project and can be accessed by selecting Other Setup => Approval Workflows, and double clicking on one of the available workflows:
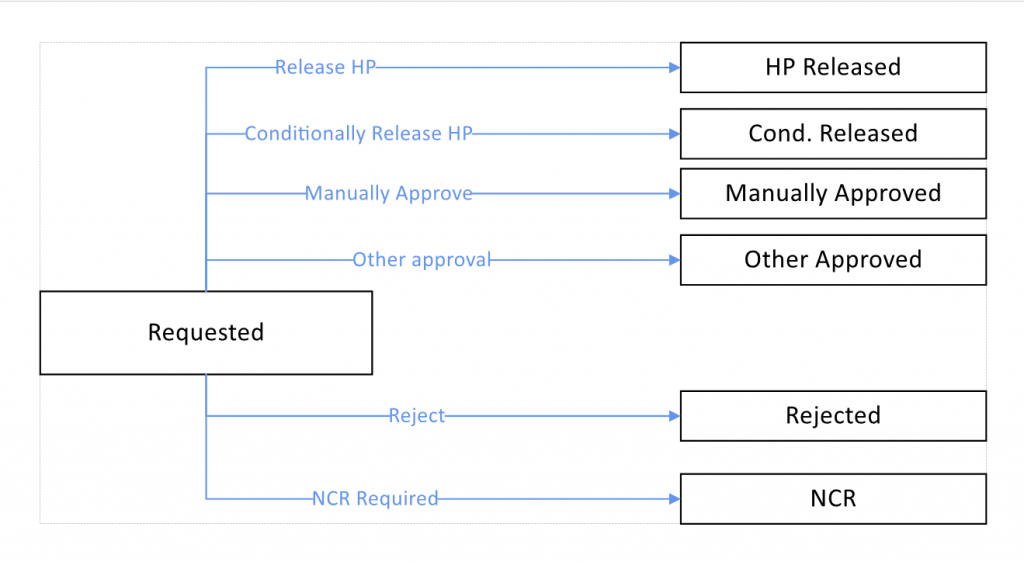
The initial status and first step for this approval workflow is Requested. At this point, there are several actions that can be completed:
- Release HP
- Conditionally Release HP
- Manually Approve
- Reject
- NCR Required
If a user completes an action, then the approval’s new status is the step that is the target of that action. For example, if a user selected conditionally Release HP, then the new status will be Cond. Released.
Steps (statuses)
Each step has several properties, properties are set by opening a workflow in the visual editor and selecting a step – the properties will be shown in the panel to the right:
- Days to Complete – the default number of days the user responsible for an action has before the approval is marked as overdue.
- Private – a step marked as private has logs for actions originating from it excluded to Approval_Collaborate_HPWP, Approval_Collaborate_NCR and Approval_Collaborate_Independent users. They are visible to users with approval view permissions.
- First Step – Every workflow must have exactly one step marked as the first step. This is the entry point into the workflow. In the example above, Requested is marked as the First step
- Alert Step – An alert step is used as a flag for identifying workflows requiring intervention. For example, in the above workflow, both NCR and Rejected would be marked as Alert step. If a step is marked both as a Complete step and an Alert step, the approval will not be marked as complete
- Approved to proceed – Marking a step as approved to proceed will change status indicators such as the check box on a checklist from pending to approved. This property will usually be set for something like a conditional approval, or the point where the action for an NCR is agreed. Steps marked as Approved to Proceed do not automatically complete a workflow unless they also have the Complete property set.
- Complete – Workflows must have at least on step marked as the end of the workflow. A workflow is marked as complete when any step with the property Complete checked is the current step. A workflow will usually have multiple steps where Complete is checked. In the example above, HP Released, Cond. Released, Manually Approved, Other Approved, Rejected and NCR all have Complete checked.
Actions
Actions are the primary mechanism by which approvals progress through the workflow. Each action has properties which dictate who can complete it, and what information is required to complete. Properties are set by opening a workflow in the visual editor and selecting an action – the properties will be shown in the panel to the right
- Requestor can action – the person who has raised the request can perform this action
- Addressee can action – any of the users the request is addressed to can action the request
- Users can action – any of the listed users can action the request
- Roles can action – any of the selected roles can action the request.
- Requires Comment – the action can only be completed if a comment is provided explaining the action – e.g. this would be appropriate if the user selected Conditionally Approved, as you would want to know under what conditions the item was approved.
- Priority – specifies the order in which available actions are listed. Higher priority items are at the top of the list of actions displayed to a user. For example, you would generally want HP Released to be the top action, with Rejected and NCR at the bottom.
Creating more advanced workflows
Lets develop our Hold Point workflow a little. In the Approval Workflow Register, select the V10 Workflow under Hold Points, and use the Clone function. When prompted provide a name – something like Hold Point Extended, and click OK. A new workflow under the Hold Point category called V10 Extended will be visible. Mark it as default, and double click it to open.
We are going to extend our conditional approval status as the client requires that conditionally approved items are returned for review upon completion. We do this by adding a new step after the Cond. Released step called Condition Completed. This is reached via an action called Complete Condition. When the condition is completed, the client then has two available actions – to approve the condition’s completion, or request revision.
In the graph editor:
- go to the Ribbon Menu’s Design page, and click on the New Step button. Draw your new step to the right of the Cond. Released step and enter a name for the step e.g. Condition Completed.
- Next to the New Step button is the New Action button. Click on this and draw a new action from Cond. Released to Condition Completed – give the new action a verb name, something like Complete Condition.
- Create another action joining the Condition Completed step and the HP Released step. Call this action Approved
- Create another action joining the Condition Completed step back to the Cond. Released step. Call this action Revision Required
You will have to move your steps around to make the diagram clear – click on the select arrow to do this. Once complete, it may look something like: this:
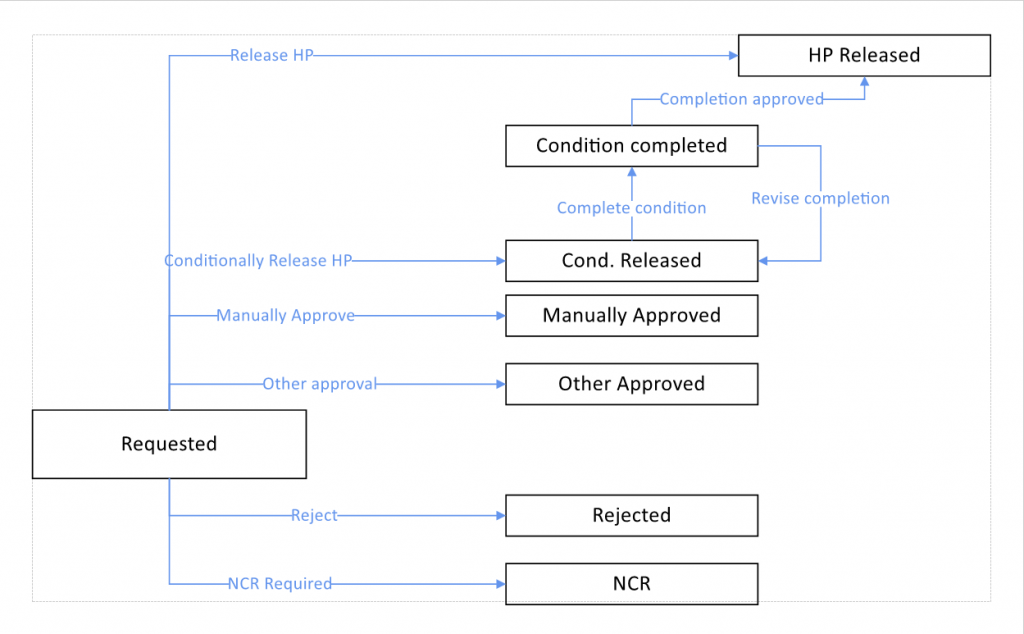
We are nearly done, but we need to update a couple of properties for the steps and actions we have added. When the addressee statuses the workflow as Conditionally Released the original requestor will then advise then the condition is completed. Following this, the addressee can either accept the condition completion, or request a revision. To reflect this, select each of the actions we have added, and set the following:
- Complete Condition – Requestor can approve
- Revise Completion – Addressee can approve
- Completion Approved – Addressee can approve
- Set Requires comment to true for the Conditionally Release HP action, and all of the new actions.
For the steps we need to do the following:
- Remove the Complete property on Conditionally Released
- Add the Approved to Proceed condition on Conditionally Released
- Update the Days to Complete property as appropriate
Using a workflow for an approval
When a new approval is created the user is required to assign the addressees and select a workflow. When this is completed, a copy of the workflow is made for the approval, and it is this copy that is updated as the workflow progresses. This means that each approval is completely independent of the Approval Workflow template it was created:
- Changes to the Approval Workflow template will have no effect on the approval unless the user explicitly uses the Update from Template function
- An approval’s workflow can be modified to add new steps and actions without impacting the original template.
Creating a new approval
Approvals are generally created from the item you are seeking approval for. The option for a new approval request is available from:
- Any checklist item that is marked as Approval Required
- Any NCR
- Any Purchase Order
The exception to this is an Independent Approval. Independent Approvals are created directly in the Approval register using the New Independent Approval button and are not directly linked to any other record. Refer to the section on Independent Approvals.
We are going to create an approval for a checklist hold point, and try out our new Hold Point Extended workflow:
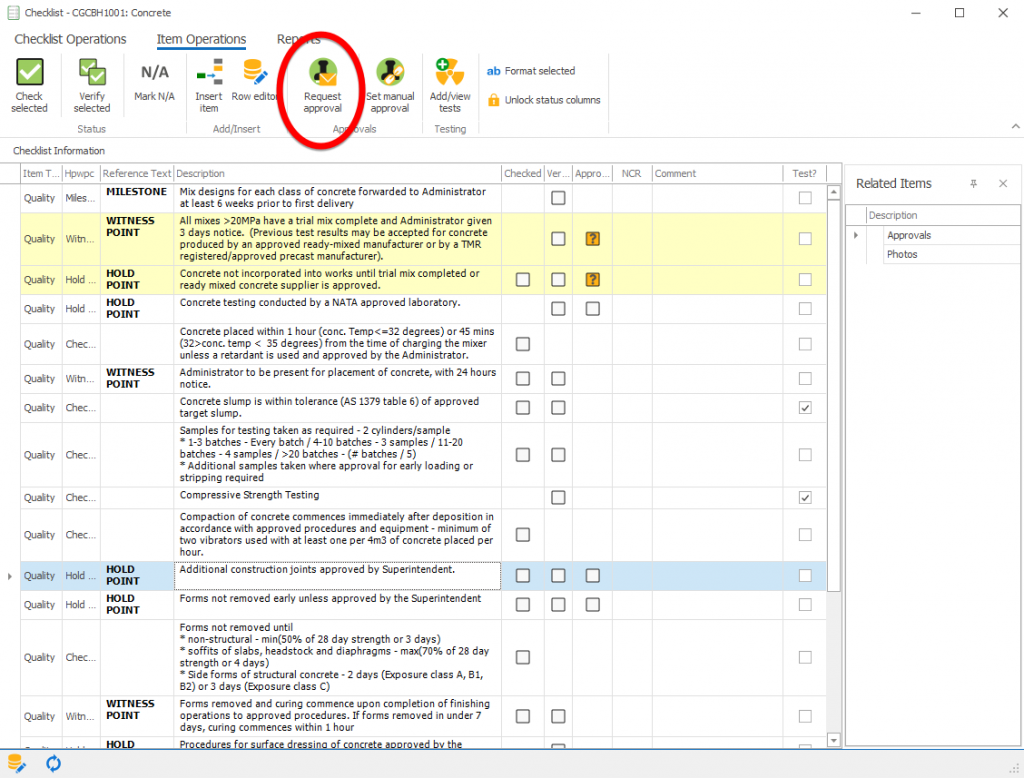
- Open a checklist that has an unapproved hold point
- Select the hold point, and click on the Request Approval button
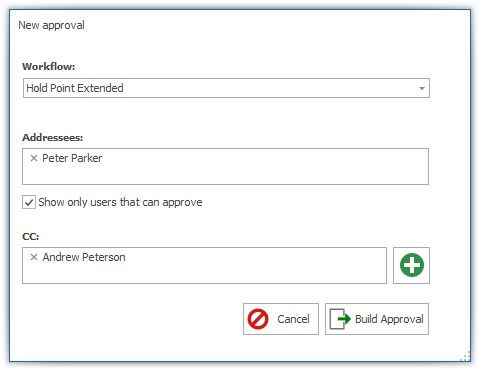
- Select the Hold Point Extended workflow. It should be prefilled as we marked it as the default for this category.
- Select 1 or more addressees. By default only users that have the necessary permissions to approve are listed. If your list is empty, you will need to cancel and assign one or more users to a role with the Approval_Collaborate_HPWP permission. If you are working through this with an example to understand the system, it is recommended that you create a new temporary user and remember their credentials so that you can log in as the addressee later and see how it all works.
- Allocate CC contacts if you want. These users are simply notified regarding the workflow’s progrees. They have no right to action the workflow, unless they are explicitly permitted to undertake an action using the action’s Users or Roles permissions.
- Click the Build Approval button and the Approval will be created and opened in a new page.
At this point, your approval has been created, and its subject and body automatically generated from the Notification Template for Approval_Check. The Notification Template is set either system wide, or for the specific project and compiles your approval automatically based on the item being requested. For more information on Notification Templates, refer to the relevant help topic.
If this is all the information necessary for your approval to be understood and actioned, then simply start the workflow and your workflow can be actioned.
Extending the Approval Request
It will often be the case that additional information is necessary for your approval to be processed. These changes are best made before starting the workflow so that they are included in the notification email. Changes you may make include:
- Modifying the templated description to provide information specific to the item in question
- Adding attachments (Filestore Docs)
- Linking to additional lots
Modifying the description is as straight forward as editing the information contained in the Approval Text section of the approval. If you make changes (or you have changed the template and want to update the approval) and want to auto-generate the original text, click on the Update Description from Template button in the Ribbon Menu.
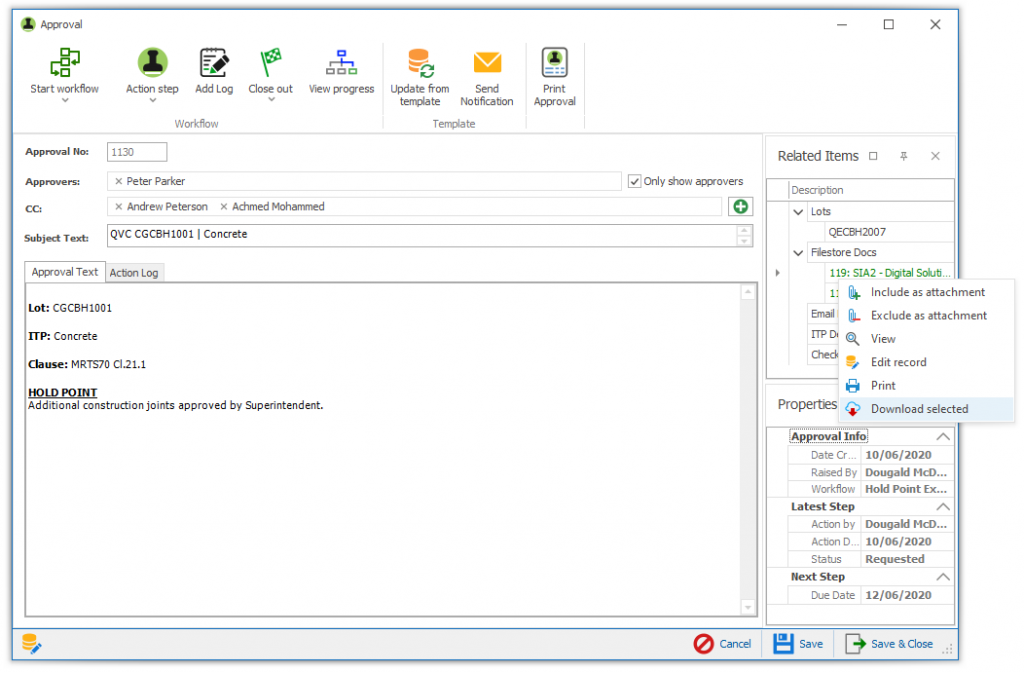
To add an attachment, double click on the Filestore Docs heading of the related items panel. Either select an existing doc, or add a new one using the New Filestore Doc button. A filestore document will be included in any notifications for the approval by default. To prevent this, use the option from the Context Menu accessed by righ-clicking on the document. This context menu also provide access to options to view the document (same as double click), print a document or download one or more documents.
Adding a lot is similarly completed by double clicking the header and selecting one or more items to link. This is the same process generally for adding related items across civil pro. To delete, select the related item, and press the delete key.
The last 2 items in the related items panel cannot be modified from the approvals, they are created when a standing approval is added to an ITP, and when that relationship is copied to checklists created from that ITP.
Start the workflow
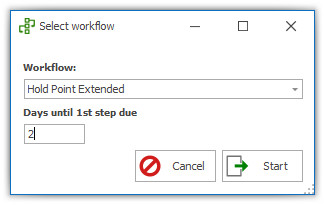
For the workflow to be available to the addressees to action, it must be started. Simply click the Start Workflow button and you will be prompted to confirm the Workflow to use (or assign one if you didn’t when creating the approval), and to update the Days until 1st step due. The days until due will default to the property specified for that step in the workflow template.
After clicking start, you will be prompted to send an email notification. You can cancel this and not send a notification at all, or send it later using the Send Notification function.
Approval action logs
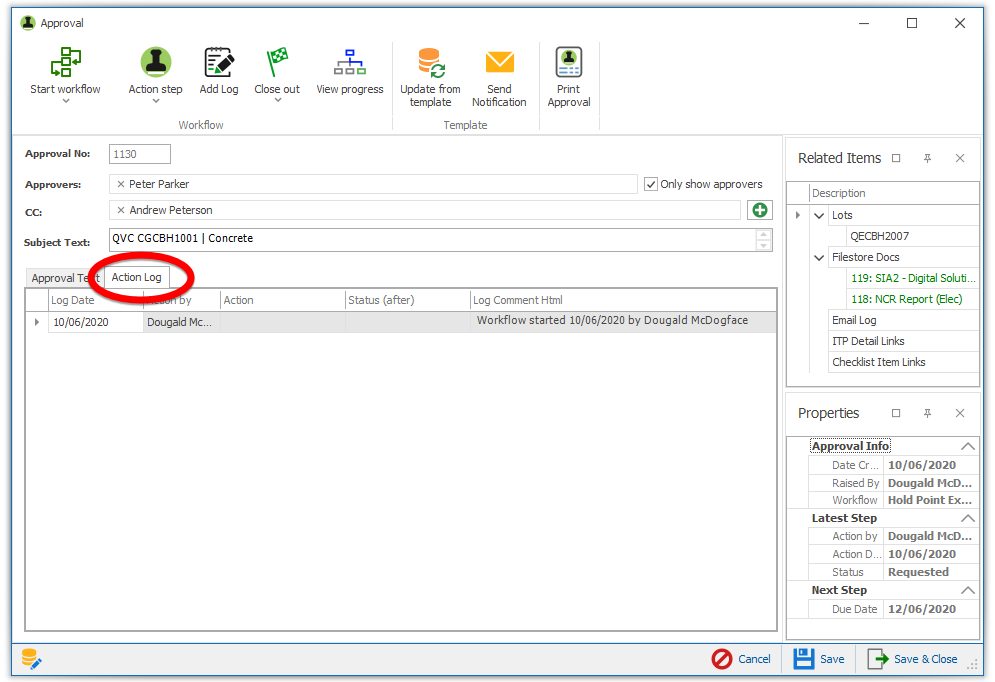
Whenever any action is taken on an approval’s workflow, it is recorded in the Action log. In fact, when you started your approval, that action will have been the first entry in the log. You can view the contents of the action log by changing the tab page where the description of the approval is shown.
Actioning Approvals
Once an approval is started, it progresses through its workflow as users complete available actions. Approvals are actioned either through the desktop application’s Approval form (the same one we used to create the approval) or through the mobile application. Continuing with the desktop interface, a user actions an approval by clicking on the Action Step button in the ribbon menu. The Action Approval Step popup will be shown.
If you do this with the example workflow we have created, you will only see one option – Manual Approval. This is because you are currently the requestor, and this is the only action you have permission to perform that originates from the Requested status. For the rest of this example, we switch over to an addressees perspective.
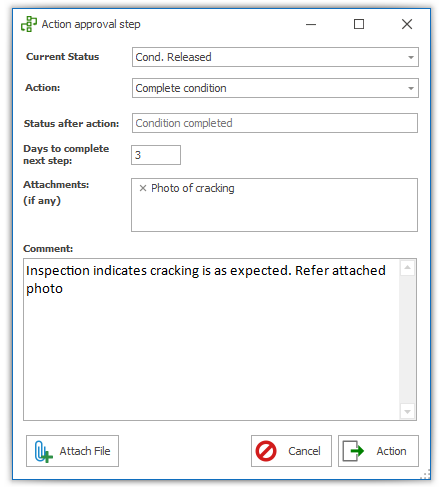
After logging out and back in as the addressee (in our case Peter Parker), open the approval again. It now looks subtly different. Several of the buttons that specific to authoring and managing an approval have been removed to make the interface simpler for approvers, as they are not available to them. Click on the Action Step button.
- Select the status to action – The latest current step is a workflow’s status. In this case it is Requested, and this is the only step that can be actioned, so there is nothing to do here. This is usually the case.

- Select an action to perform. In this case we are conditionally approving the hold point, so select that item
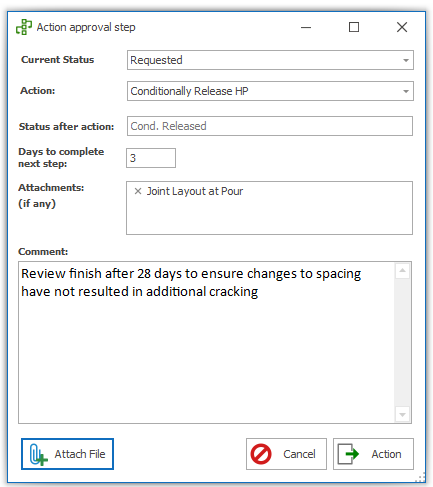
- Update the default days to complete next step if necessary
- Add attachments by clicking the Attach File button and selecting them in the popup. Approver_collaborate users will only be able to add new files, or select from files they have added previously. They do not have access to the filestore unless they are granted Filestore View permissions.
- Provide a comment. In this case, the approval action cannot be completed without one, because we marked the action as Requires comment.
- Click the Action button – the workflow’s status will be updated, and a notification prepared for preview and email.
If you select a status that completes the workflow, for example Hold Point Released, then you will see that the Days to complete next step editor disappears because obviously, there is no next step.
In our example, the approval addressee has chosen to conditionally approve the requested approval. This will cause the normal change to the approvals status, and because of the way we defined our revised workflow some other things will happen in the backgound. When the action is submitted:
- The approval will be actioned setting the status to Conditionally Released
- A notification will be prepared to send to users who can action the new step. Refer to the notifications section below for more information on the To and Cc list composition.
- Because the Conditionally Release status is marked Approved to Proceed, the original Hold Point will be approved with the actioner’s initials and the date the step was reached. Subsequent resolution of the conditionally approval is managed exclusively in the Approval from this point. This would also occur if a step marked as Complete, and which wasn’t marked as Alert was the new status
- A new log entry will be added to the approval describing the action completed, and any comments made.
Subsequent Actions
Continuing our V10 Extended workflow example, you will note that the addressee now has no actions they can complete. That’s because there is only one action available from the Conditionally Released status in our workflow design, and the permissions for that action are set for the requestor to action, and no-one else. So lets log on as ourselves again.
Now when we access the approval, our actions list includes Condition Completed. When we have satisfied the condition of the Conditional Release agreed by the addressee, we can Action the approval – and we will of course be required to provide a comment.
At this stage the approval is back in the hands of the addressee. Loging in as the addressee for the last time, we can see our options are either to approve the completion of the condition, or request changes. We are going to approve the completion, thus finalising the approval.
Short circuiting an approval
Sometimes it may be necessary to jump around the workflow due to events that are not easily tracked by the workflow itself. There could be many reasons why this is necessary such as:
- Information is provided by an authority or addressee from outside the system that changes the workflow status
- A fringe case needs to be supported for which it is not worth complicating the workflow
- An error is made in the actioning of approvals
In this case, the workflow can be short circuited. Short circuiting an approval requires Admin_Delete permission on the approvals register.
For our example above, lets say that after the addressee conditionally approved, there was a meeting on site between the contractor and client was actually inspected. Rather than proceed through the rest of the workflow, the requestor may have simply elected to short circuit to the HP Released step and made an annotation in the comment regarding the date, time and attendance of the inspection. To execute the short circuit, click on the Short Circuit button (found in the drop down menu under the Action Step button in the ribbon). After confirming the warning message, a screen similar to the Action Approval is shown.
This time however, the drop down will show all of the steps in the workflow. Select the step representing the new status you want the approval to have, and update the number of days allowed for statusing as appropriate. You will also need to provide an explanation of why the short-circuit was required for the log.
Upon completion of the short circuit:
- The approval’s status is set
- A notification is drafted and presented to the user to send (or not)
- A log is created
Completing the workflow
When a workflow is completed, the underlying approval item is marked as completed. This occurs when:
- A step marked as a Complete step, but not marked as an Alert Step is reached either through the normal progress of the workflow, or a short-circuit; or
- The approval is Manually Approved; or
- The approval is closed out.
Approval item status
The status of the approval item (e.g. the HP, WP, NCR or PO that the approval is based on) is generally dictated by the progress of the workflow. The approval item is marked as complete when:
- A step marked as Approved to Proceed is reached regardless of whether the workflow itself is complete; or
- The workflow is completed; or
- The approval item is manually approved outside the approval system.
Manual and Direct Approval
Manual and direct approvals are the same process, the difference being that a manual approval of a Purchase Order is called a direct approval due to the difference in intent and required permissions.
Manual Approval
A manual approval completes an approval and bypasses the workflow. The history of the workflow is still retained, but both the approval and the item the approval is for, are marked as approved. A manual approval can be performed on a checklist item or an NCR and is usually performed when evidence of approval is available from outside the Civil Pro system. Generally, if it is possible to short circuit the approval based on the same information, then that is a more explicit and preferred solution.
If you find that certain items are usually being approved manually, then an approval request is probably not the appropriate path to documenting approval. Consider just manually approving the item in the checklist or NCR instead.
Direct Approval
A direct approval is essentially the same as a manual approval, but can only be performed on Purchase Orders. The terminology differs because a Direct Approval can only be performed by a user with sufficient purchasing limit. As a result, it is an operation performed to quickly complete a purchasing operation in accordance with required approval limits, rather than an administrative operation where the actual approver does not validate the approval.
Manual | Direct Approval Permissions
A manual approval can be executed by anyone with Approval Admin permissions EXCEPT for approvals relating to Purchase Orders. Approvals relating to purchase orders are called Direct Approvals, and can be performed by anyone with sufficient purchasing limits.
Sending notifications
Notifications are prepared and prompted when events occur in the worklow process. Notification triggers are:
- The workflow is started
- The approval is actioned
- The workflow is short circuited
- The workflow is manually approved
- A log is manually added to an approval
- A notification is sent manually
A notification is compiled from the approval information using the Approval or Approval Action notification template.
Notifications are prepared with a pre-filled To and CC list. This can be changed in the notification preview, but by default the notification is addressed as follows:
- To: Each notification is sent to the user(s) with authority to complete an available action. For example, when the workflow is started, if all of the available steps are only marked Addressee can action, then anyone in the Approval To list is added. If Requestor can action is marked on any action, then they are also added to the To list. Similarly if a user is explicitly permitted to action the approval, then they are also on the To list. Role permissions are NOT automatically added to the To list in any situation.
- Cc: All notifications are Cc’d to the approval’s To and Cc list, and to the requestor if they are not already in the Cc List.
If there are users you need to perform an action who are not addressees but have a role permission for a step, then you will need to manually add them to the email addressee list. Role permissions are not added by default.
It is important to understand that any changes made to the email notification form will not be included with the approval. This means any addressees or CCs, or attachments added on the notification are not recorded on the approval, although they will be listed on the email log when the notification is sent. If you need an attachment to be recorded against the approval, then cancel, and add it as a filestore related item before sending the notification. It is possible to configure filestore docs so they are not included in notifications – refer above section on Extending the Approval Request
An important note on Permissions
Aside from the general permissions dictating who can action a workflow during the normal course of events, there are some specific rules around permissions for Approvals.
Limits to approval view
View permissions on Approvals is not on its own sufficient to view the approval register’s contents – although it will always open the register. The contents of the Approval Register will only include approvals for categories the user also has access to. For example:
- To view approvals relating to NCRs, the user also needs NCR View permission
- To view approvals relating to Checklists (HP / WP / Check), the user also needs Checklist View permission
- To view approvals relating to Purchase Orders, the user needs Purchase Order View permission
- View permission alone is sufficient to see Independent Approvals
In addition, Users with only Approval_Collaborate_HPWP, Approval_Collaborate_NCR or Approval_Collaborate_Independent users can also see the approvals in the Checklist, NCR and Independent categories respectively.
Special rules for Purchase Orders
Purchase order approvals follow the same rules as other approvals with one significant exception. Any step that completes or approves the workflow can only be executed by a user with sufficient purchasing limit. The purchasing limit is a property of each role. A user’s limit is the maximum PO limit they are assigned across all of the roles they hold on the project.
When a user actions or short circuits a step, approval or completion actions/steps will be removed if the user has insufficient PO limit, even if they otherwise would be permitted to complete the step through normal approval permission routing.