Each project has a set of Specifications detailing the requirements for acceptance of products delivered under the contract. This is communicated to the project team through a set of documents called Inspection Test Plans, and validation of conformance is provided by associated Checklists.
In the Civil Pro system, the Specification Register is used to create both ITPs and Checklist templates.
- Each Inspection Test Plan is a list of the work associated with a specific activity including responsibility, specification reference and the method of verification.
- The Checklist template is used in the field as a record that the personnel responsible have verified conformance with the Specification.
Note: It is important to understand that the Checklists created using the Specification Register are only a Checklist template. When you issue a Checklist, it is the template that is copied and assigned to a specific Lot (refer to the Lot Register topic). Any changes you make to the Lot Checklist do not impact the Specification Checklist template.
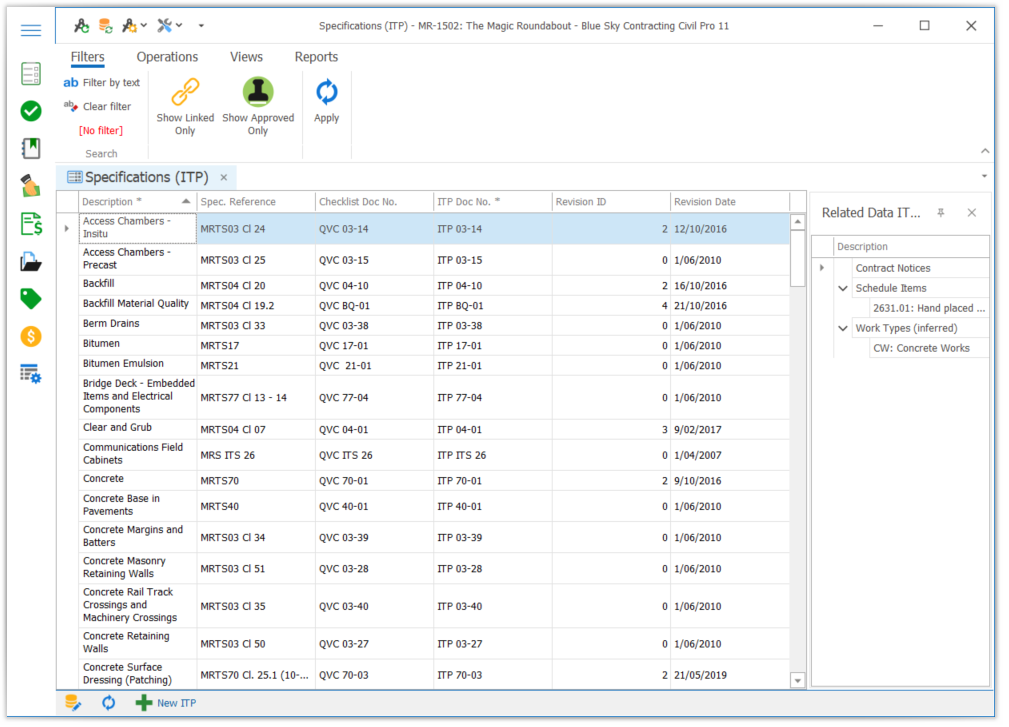
The Specifications Register is accessed from the Specifications and Conformance section of the Main Menu.
Specifications can be linked to Schedule Items. The Checklists which are created from your Specifications can be linked to Lots.
Contents
- 1 Specifications structure
- 2 Specifications fields
- 3 Specification detail fields
- 4 Specification test fields
- 5 Adding a new specification
- 6 Creating specification detail
- 7 Adding specification tests
- 8 Formatting specification text
- 9 Updating a specification
- 10 Importing ITPs
- 11 Related Items
- 12 Formatting checklists
- 13 Specification functions
Specifications structure
The Specifications Register is a list of the different Specifications for which an ITP and/or Checklist will be developed. Each entry in the Specification has one or more Specification detail entries. Each Specification detail line refers to an element of the Specification which is to be inspected or tested.
Where a Specification detail line describes an activity that is verified using conformance testing, one or more tests can be added to that Specification detail.
Specifications fields
- Description – a text description of the Specification (or associated ITP)
- Specification Reference – a reference to the project Specification or industry standard from which the ITP is derived
- Checklist Doc Number – a document number added to the footer of each Checklist
- ITP Doc Number – a document number added to the footer of each ITP
- Revision ID – an identifier to track the current version. Any edits will prompt the user to update this number
- Revision Date – the date of the current revision. Any edits will prompt the user to update this number
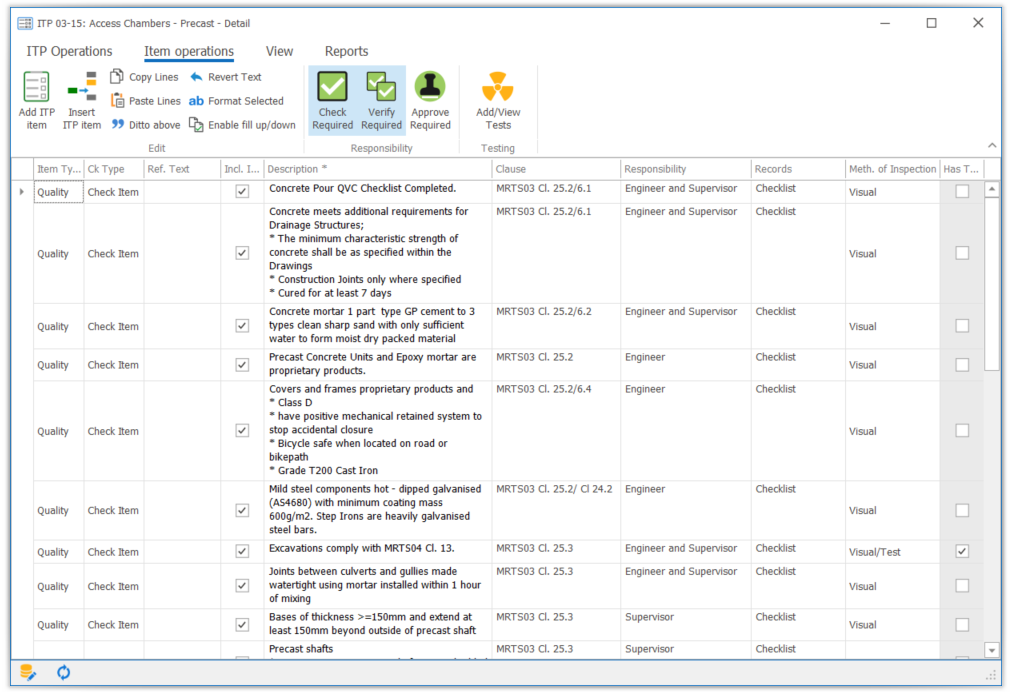
Specification detail fields
Each Specification detail line provides the information for both the ITP and Checklist.
The following fields are visible in both the Checklist and ITP views:
- Item Type – Quality, Health and Safety, Environment, Community, Other or Heading. These are used to classify Specification details
- Ck Type – is this item a Check Item, Witness Point, Hold Point, or Milestone.
- Description – what is to be inspected (in detail). This can be formatted as rich text
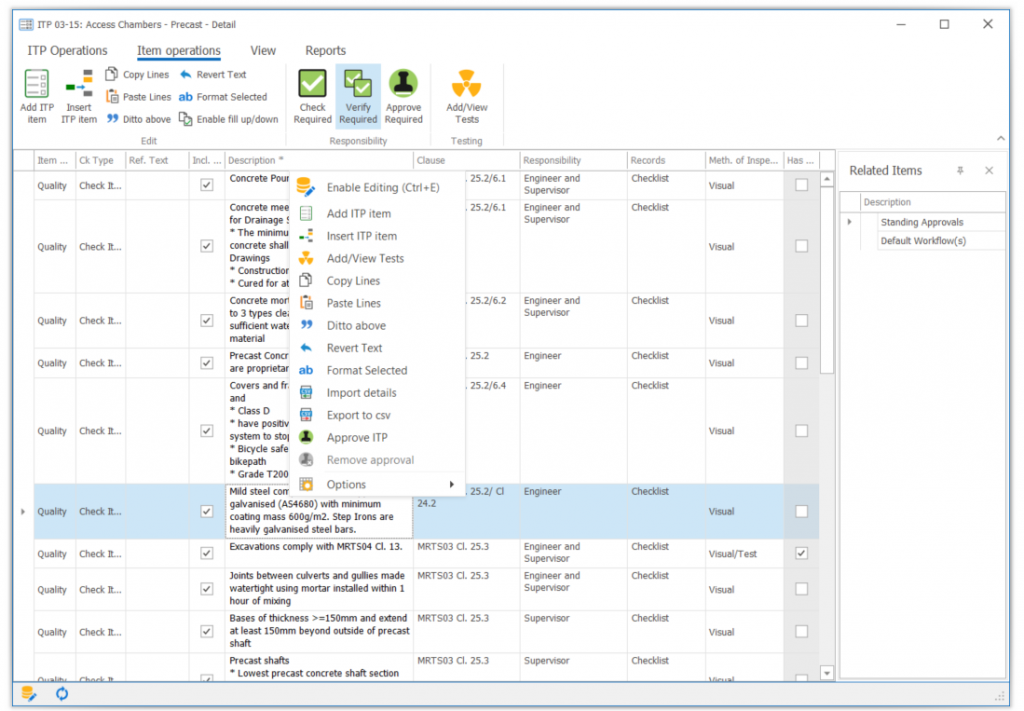
The following fields are only shown in the ITP view:
- Incl ITP? – is this detail item included on the ITP?
- Clause – the specification clause related to this Check Item
- Responsibility – who is responsible for ensuring the check is complete
- Records – how is completion of this check recorded and verified
- Method of Inspection – what method is used to check this item (e.g. visual inspection, concrete test, measure with survey etc)
- Has Tests? – a read only field that is checked if the Specification detail item has any attached testing
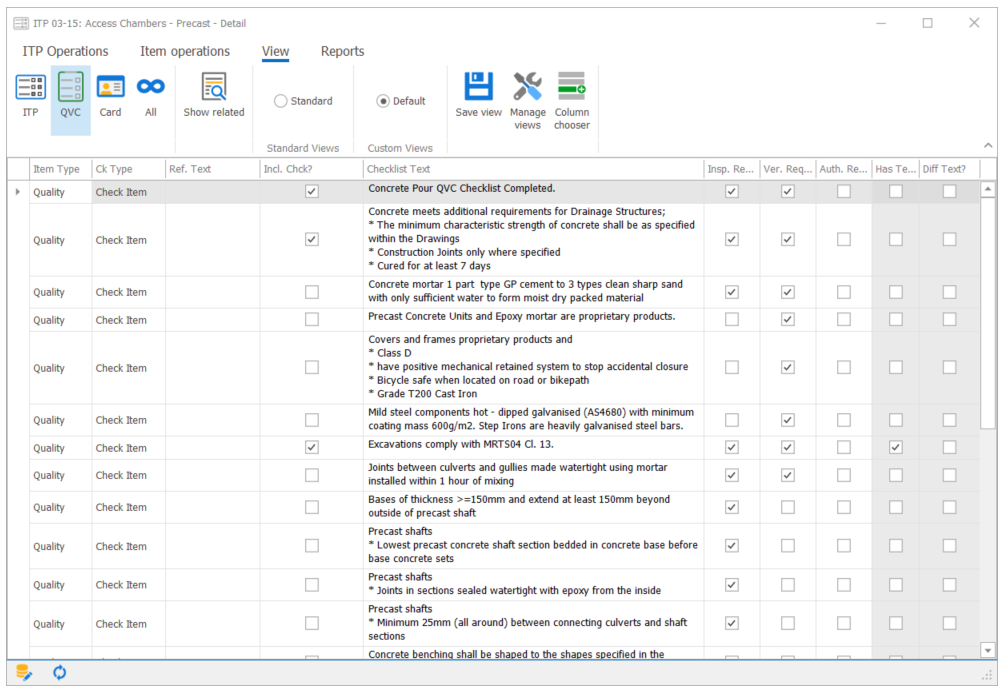
The following fields are only shown in the Checklist view:
- Incl Chck? – is this detail item included on the Checklist?
- Inspection Required – if unselected the “Inspection Required” column of the checklist is greyed out
- Verification Required – if unselected the “Verification Required” column of the checklist is greyed out
- Authorization Required – If unselected the “Authorization Required” column of the checklist is greyed out
- Has Tests? – a read only field that is checked if the Specification detail item has any attached testing
- Diff Text? – a read only field that is checked if the Specification Checklist text has been manually edited.
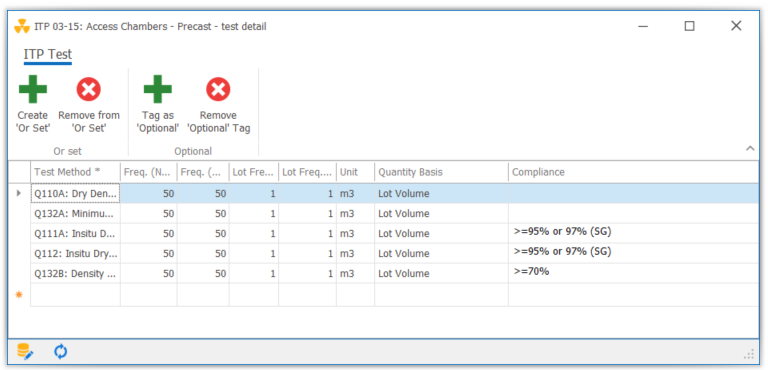
Specification test fields
Each Specification detail line can have one or more tests associated with it. The tests which can be added are listed in the Test Method register. The following fields are available for each Specification Test Method:
- Test method – the type of test to be performed
- Freq (norm) – the quantity of material for which 1 test is required at normal levels of testing, e.g. if testing is required at 1:1000m3, then this field should be set to 1000
- Freq (red) – the quantity of material for which 1 test is required at reduced levels of testing, e.g. if testing is required at 1:500m3, then this field should be set to 500
- Lot Freq (N) – the minimum number of tests required for each lot at normal levels of testing
- Lot Freq (R) – the minimum number of tests required for each lot at reduced levels of testing
- Unit – the unit on which the Lot Freq is based
- Quantity Basis – the lot property on which the Lot Freq calculations should be based: Schedule Qty, Lot Length, Lot Area or Lot Volume
- Compliance – the result of the test which would indicate compliance with the Specification. This can be formatted as rich text
Adding a new specification
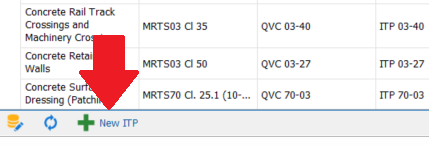
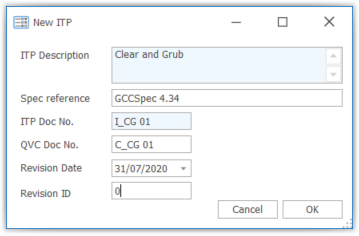
- Click on the New ITP button in the Register Menu or click on New ITP under the Operations heading in the Ribbon Menu.
- In the popup, complete the fields describing the new ITP.
- To create a New Specification, Enable Editing and click on a new line. Enter the required fields (the headings of required fields in a grid are marked with an asterisk), and any other fields for which the data is available.
Note: the Specification are ordered alphabetically so after entering, if your new Specification disappears it is because it has been ordered automatically.
Creating specification detail
- Once the new Specification has been defined, you can create the Specification detail by double clicking on the relevant Specification in the Register. The Specification detail will be opened in a separate page. The ITP view will be shown by default.
- Enable Editing, and click on a new line. Enter the required data and complete until the Specification detail for the ITP is complete.
Note: Remember that the Has Tests? checkbox is a read only field at this point.
To enter the Checklist details which describe the check, verification, approval requirements for each Specification detail, change the view by clicking on the desired layout under the View heading in the Ribbon Menu. The available views are:
- ITP – shows the Specification details relevant to an ITP
- Checklist – shows the Specification details relevant to a Checklist
- Card – shows all of the Specification detail fields in a form layout
- All – shows all of the Specification detail fields in the grid layout
Changing the order of specification details
You can change the order of items in the specification detail list.
- Enable Editing.
- Drag the row you want to reorder. It will be repositioned below the row it is dropped on. To drag the row, click and hold on the grey bar to the left of the row.
Adding specification tests
Specification Testing is accessed by double clicking a Specification detail line then invoking the Context Menu and selecting the View/Add Testing option or selecting this options from the Ribbon Menu. A popup will be displayed with either the list of existing tests, or a blank list to specify new tests.
You can identify which Specification details have testing specified using the Has Tests? column which is displayed at the right of the ITP grid view.
Formatting specification text
Three of the specification fields support formatting of the text:
- Specification Detail – Description
- Specification Detail – Checklist text
- Specification Tests – Compliance
To format text in these fields, select the text you want formatted, bring up the Context Menu by right clicking and select from the Formatting menu. Normal formatting key shortcuts like CTRL-B (bold), CTRL-U (underline) and CTRL-I (italic) also work.
Updating a specification
To update a Specification Enable Editing using the button at the left end of the Register Menu, or use the Context Menu option to do the same. Then directly update data in the grid of the Specification itself or the Specification detail page.
Note: If you have edited/changed the Checklist Text within the Checklist View and you want to revert to the default text, simply select the Revert Text within the Context Menu.
Deleting a specification
To delete a Specification detail:
- Open the specification detail page by double clicking on a specification
- Enable Editing and select the record to delete
- Press the delete key
To delete an entire Specification including all of its details and related data links, follow the above instructions, except using the Specification Register, not the Detail page.
Importing ITPs
ITPs can be imported in 2 ways:
Import from CSV
- Create a new Specification entry as per above.
- Double click on the new Specification to open the Specification Detail page.
- From the Specification Detail page, select the Import Specification Detail function from the Context Menu or the Ribbon Menu.
- Complete the Import Wizard as described in the Importing Data topic
Import/Export structured CPX files
Once you have a set of Specifications set up in Civil Pro, it is likely that you will want to re-use these on other projects. Civil Pro makes this easy by providing functions to export the entire structure for one or more specifications.
To export specifications
- Select one or more Specifications in the Register. To select multiple records, hold the CTRL key.
- From the Ribbin Menu under the Operations heading or from the Context Menu choose Import/Export => Export specifications (single file) or Import/Export => Export specifications (separate files):
- Export specifications (single file)creates a single file containing all of the selected specifications.
- Export specifications (separate files)creates individual files for each of the selected specifications using the specification description as the file name.
To import specifications
- In the Specification Register, select Import/Export => Import specifications from the Context Menu or from the options in the Ribbon Menu under the Operation heading
- Select the CPX file containing either a single Specifications or multiple Specifications
Related Items
Specifications can be linked to Schedule Items. The related items for each Specification are shown in the Related Items Panel to the right of the register. If it is not visible, you can reveal it using the Context Menu’s Show Related Items function or from within the Ribbon Menu under the View heading. Related items are linked in the standard way as described in the Adding, Updating and Deleting topic.
The Related Items Panel also shows inferred links to Schedule Items. These links cannot be created directly from the Specification Register, they are calculated by identifying any Work Types linked to the same Schedule Item as the current Specification.
Where you have projects with similar Schedule Item numbers, you can automate the process of creating links between Schedule Items, Work Types and Specifications. These functions are described in the Schedule Items topic, but are also available from the Specification Register Context or Ribbon Menu.
Formatting checklists
The checklist has Quick Customization options to optionally show checkboxes vs sign off boxes, included sign off signatures and include areas for comments and quantities. Refer to the Custom Reports help topic for information on how to change the layout of your checklists.
Specification functions
The following functions are accessed from the Context Menu and via the Ribbon Menu of the Specification and Specification details pages unless noted otherwise.
Format selected
Displays a font formatting dialog for applying a format to the entire description field of every selected Specification detail. When applied at the Specification Register level, formatting is applied to every Specification item in all of the selected Specifications.
ITP/Checklist include / exclude
Sets the Checklist include field or ITP include field for every selected Specification detail. When applied at the Specification Register level, update is applied to every Specification item in all of the selected Specifications.
Show linked only
The Show Linked Only function is accessed from the Context Menu of the Specifications Register. This function filters the grid to show only those Specifications with links to Schedule Items. This button is a toggle, and selecting it again shows all of the records.