Contract Notices provide a way to easily generate standardised contractual communication documentation based on and linking to existing project records such as lots, NCRs, variations, controlled documents, ITPs, approvals, photos or other contract notices.
Contract Notices are found under the Document Manager heading within the main menu to the right of the screen. Clicking on the Contract Notice option will open the Contract Notice Register.
Contents
Contract Notice Fields
- Notice type – a drop down giving option of all notice templates
- Raised by – the user raising the contract notice
- Notice to – the person to whom the notice is addressed
- On behalf of – who the notice is being sent on behalf of
- Date – the date of the notice
- Date required – the date a response is expected
- Date sent – the date the notice was sent
- Subject – the subject of the notice (automatically completed when the notice type is selected)
- Approval required – this box is checked if the notice requires approval
The status flow of a Contract Notice
A contract notice passes through several statuses in its lifecycle:
NOTE: Some of these statuses refer to the mobile site. It is completely valid to use contract notices without the mobile site.
- Rendered: When the content of a contract notice is complete, it can be rendered by clicking the Render button in the bottom toolbar. This sets the text of the document and removes all fields. You can still add new related items, but they will not affect the text of the notice
- Published: If you are using the Civil Pro mobile site, published documents will be visible on the site. Publish a contract notice by clicking on the Publish button in the bottom toolbar. Any published notice will first be rendered. Published notices are locked to editing.
- Emailed: You can email a contract notice to the recipients (or anyone else) from the notice. Doing this also renders and publishes the notice. Clicking on the Email button in the bottom toolbar opens the Email dialog with the contract notice template and any attachments.
- Responded: A response to the contract notice has been received through the mobile site
- Closed Out: Any actions associated with the document have been completed.
Creating a new Contract Notice
- To create a new contract notice, click on the New CN button at the bottom of the screen
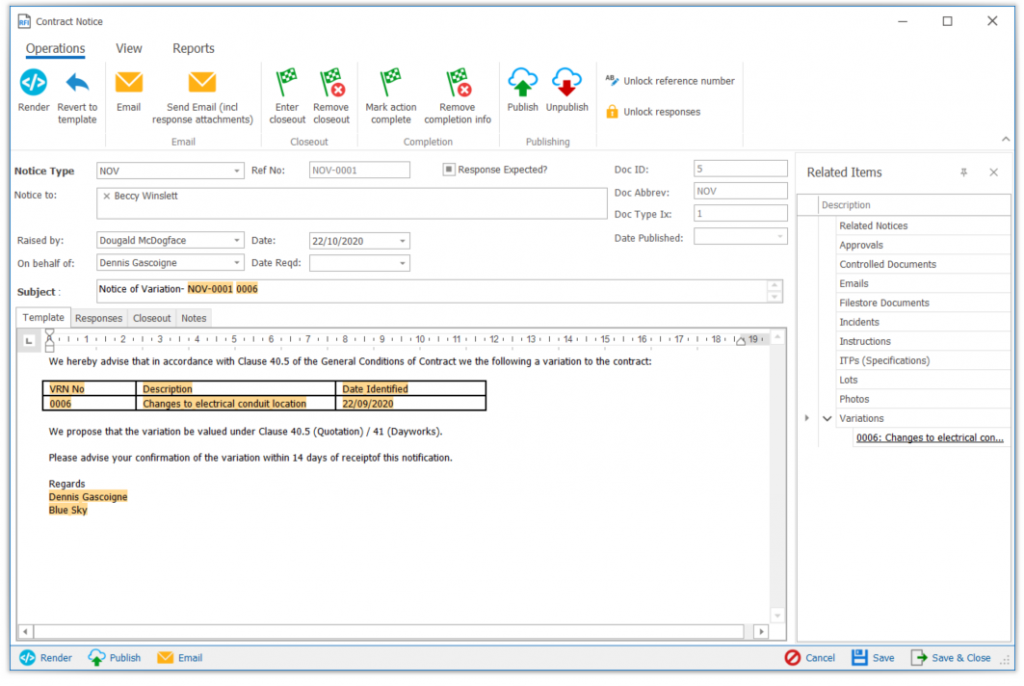
- The new contract notice screen will open. From the Notice Type drop down, select the template you wish to work with. The subject and body will be populated with the text of the template for the selected notice type. Any fields will be coloured orange and will be updated based on the related items of the contract notice. NOTE: The related items will not be available until the contract notice is saved.
- Complete the other header fields as required (i.e. notice to, on behalf of, date required etc).
- Click Save. This will populate an empty Related Items Tree to the right of the screen.
- Add related items to populate any fields in the contract notice – refer to below section on adding related items.
Editing
Once the template type has been selected, the subject/body will be filled with the text from the selected template. Any fields will be updated with the data from any included related items (refer to the section below on including/excluding related items) until the notice is rendered.
All of the text for the notice except fields can be edited until the document is published. Once a notice is rendered even the text that was previously in fields can be edited.
You can format your notice using options within the context menu. From the context menu you can select Font, Paragraph, Numbering & Bulleting and Indent as described previously. If you want a more complete editing experience similar to word, then use the Open in full editor option from the context menu.
Note: Editing your contract notice here will NOT update the notice template. If you would like to update your notice template you must do this through the notice template section.
Adding Related Items
- Select the type of related item you wish to attached by double clicking on the heading within the related items tree. This will being up a selector dialog.
- Either double click on the record you want to add, or select multiple records and drag/drop them onto the heading in the related items panel. These related items will now appear within the related items tree.
- Close the dialog selector box.
Double clicking on any related item will either display the selected record, or navigate to in its register, depending on the type of the related item
Including Related Items as Attachments
By default, any Filestore docs added to the contract notice will be included as attachments when the notice is emailed. You can prevent a related filestore doc being added as an attachment by right clicking and selecting Exclude as attachment. You would do this in the case that a filestore document was relevant to the contract notice and was associated for information, but you did not want it sent with any emails.
All other related items are NOT included as attachments by default. If you want any of the other related items (other than controlled documents) added as an attachment, then right click on the item and select Include as attachment.
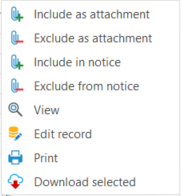
You can identify which related items are included as attachments as they will be displayed underlined in the related items tree.
Excluding Related Items
There may be items that you wish to have related to the notice but not appearing in fields in the notice itself. You can obviously render your document and then delete the text relating to the related item, but Civil Pro allows you exclude individual items as well. To do this right click the related item and select Exclude from Notice.
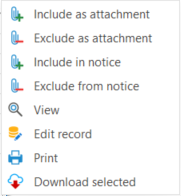
You will then see that the item will not be included in any fields. You can quickly tell which items are included in the notice as they appear in green in the related items tree while those that are related but not included appear in black. In the below screenshot, 4. Lot Map will not be rendered into any field.
Rendering, Publishing & Emailing
Rendering
When you are happy with your notice click on the Render button in the Register Menu. This sets in place the selected related items in the field place holders ready for publishing. Note: you can still edit the normal text of your notice after rendering.
Publishing
To publish the notice and there by make it available for viewing/responding click on the Publish button at the bottom left of the page. Note: once published your notice is locked and cannot be edited.
Emailing
To email a published notice to related party for viewing/response click on the Email button at the bottom left of the page. Note: once emailed your notice is locked and cannot be edited.
This brings up an email dialog box. Select the name of the email recipient/s from the drop down on the To field. Do the same in the “cc” field if required. Note: the sender of the notice is automatically “cc’d” so that they have a record of the notice sent.
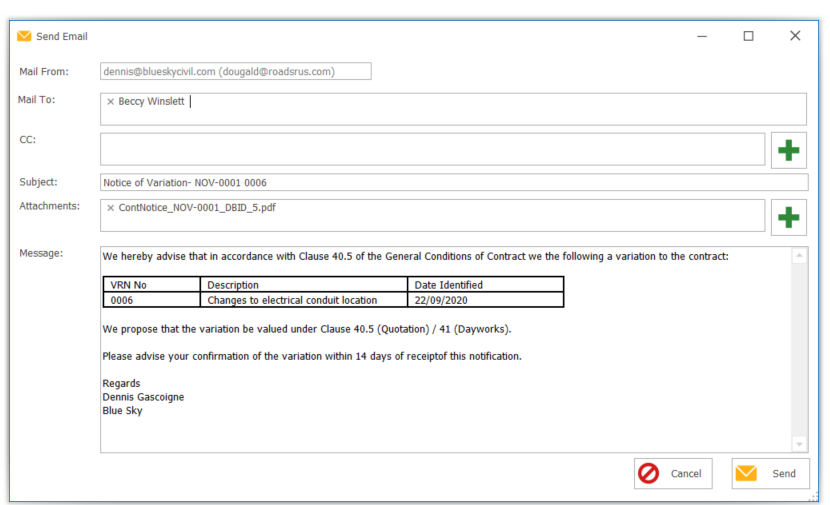
Tip: You can do all the above steps in one click – when ready just click Email. You will tolded the notice will be emailed and locked for further editing and asked if you wish to proceed – click OK.
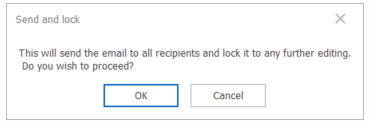
Adding an Attachment to an Email
At this point, if you wish to add any supporting documentation to your email just click on the green + sign on the right of the attachments field.

This will open the file selector. Select the document from within your system and click Open.
Reverting to Template/Unpublishing
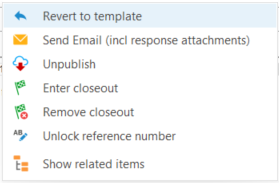
To revert to a template at anytime or to unpublish, select either Revert to Template or Unpublish from within the Operations heading of the Ribbon Menu or from the Context Menu
Responses
If using the mobile platform the response will be entered directly by the addressee/s and will appear in responses screen accessed by clicking on the Responses tab at the top of the notice body section. However if you have received a response verbally or by other means you can enter the details directly:
- Click on the Reponses tab at the top of the body section of the notice then click on the New Response button at the bottom left of the screen.The Responses screen will appear. From the active dropdowns select the Person to Action and Required Date (if relevant) and enter in the response into the Response text area. When finished click on Save & Close.
- The information entered will now appear in the Response section of the contract notice.
- If the notice has been sent to multiple people, multiple responses may be added. Simply click on the New Response button and enter any additional response information as described above. All responses will appear in the Reponses tab.
Alternatively you can attach as response as a Filestore document and put an appropriate reference to the document in this section.
Actioning Responses
If a response requires an action for completion, once this is done it can be recorded in Civil Pro.
- Select the response that is to be marked Action Complete from the list in the Response tab.
- Right click to bring up the context menu and select Mark Action Complete.
- Within the responses register the data actioned column will be automatically completed with the days date.
If as part of marking as actioned there is additional information to record, simply mark the original response as actioned, then create an additional response including the actioned information.
Closeout
When all actions relating to the notice have been completed the notice may be closed out:
- Right click in the header section of the notice to bring up the Context Menu and select Enter Closeout from the options.
- This will bring up the Closeout details screen. Use the drop down options to update the Closeout By and Closeout Date fields if required and simply type the closeout information in the Close Details field. Click Save & Close.
Notes
To enter any other information regarding the notice use the Notes field – simply enter any notice directly into the Notes field.
Reports
To print the contract notice click on Reports at the bottom left of the notice.
Filtering
The contract notices filter appears at the top of the Contract Notices Register under the Filters heading

It consists of 5 data categories that contract notices can be filtered by in order to present the most relevant data to the user depending upon their requirements at the time:
- Search
- Status
- Response
- User
- Actions
There is also an apply button to the very right of the ribbon. This MUST be clicked after a filter selection has be made in order to bring up the required data.
Search
This filter allows you to search by the following:
- Reference
- Text
- Contract Notice Date
- Action Date
Find by Reference
This filter allows you to search by the contract notice reference details (e.g. NOV-001):
- Click on the Find by ref heading
- The search dialog box will appear. Type in the reference and click Apply
- Click Apply at the very right of the filter ribbon
Find by Text
This filter allows you to search by relevant content contained within the notice:
- Click on the Find by text heading
- The search dialog box will appear. Type in any relevant identifying text and click Apply
- Click Apply at the very right of the filter ribbon
Find by Contract Notices Date
This filter allows you to search by the contract notice date:
- Click on the Find by CN date heading
- The date filter dialog box will appear. Select the relevant date range from the dropdowns and click Apply
- Click Apply at the very right of the filter ribbon
Find by Action Date
This filter allows you to search by the action date:
- Click on the Find by action date heading
- The date filter dialog box will appear. Select the relevant date range from the dropdowns and click Apply
- Click Apply at the very right of the filter ribbon
Status
This filter allows you to search by the following:
- Not closed out
- Closed out
- All
- Click in the circle next to the appropriate heading
- Click Apply at the very right of the filter ribbon
- Any notices fulfilling the criteria of your search will appear in the register
Responses
This filter allows you to search by the following:
- Incomplete responses
- Any response
- All
- Click in the circle next to the appropriate heading
- Click Apply at the very right of the filter ribbon
- Any notices fulfilling the criteria of your search will appear in the register
User
This filter allows you to search by the following:
- Raised by me
- Sent to me
- All
- Click in the circle next to the appropriate heading
- Click Apply at the very right of the filter ribbon
- Any notices fulfilling the criteria of your search will appear in the register
Action
This filter allows you to search by the following:
- Me to action
- Actions required by me
- All
- Click in the circle next to the appropriate heading
- Click Apply at the very right of the filter ribbon
- Any notices fulfilling the criteria of your search will appear in the register