This help topic describes how an individual progress claim is created and managed. Prior to reading this help topic it is essential that you understand the concepts described in the following help topics.
The Progress Claim detail is basically a copy of the schedule with additional information regarding quantities of work completed, and optionally quantities certified and forecast. From this information Civil Pro calculates values for each Schedule Item and sums them to generate the overall Progress Claim values.
A basic Progress Claim requires only the addition of quantities of work completed to date.
If you use Civil Pro’s financial module to its full capacity then updating the following quantities will allow periodic reporting, adjustments for earned value and forecast project at completion valuation:
- Quantity to Date (QTD)
- multiplied by the sell rate to provide the value for each schedule item
Value = QTD * Sell Rate - multiplied by the Direct Job Cost (DJC) rate to provide the budget for each item
Budget = QTD * DJC Rate
- multiplied by the sell rate to provide the value for each schedule item
- Certified Quantity
- provides the option to switch reports and summaries to utilise the value certified by the client, rather than the amount claimed
- necessary for the calculation of budget and revenue in the subsequent reporting period as
Periodic Qty (this claim) = Quantity to date – Previous certified qty
- Over/Under Qty (OU Qty)
- allows the adjustment of the claimed quantity to reflect the work actually completed where it differs from the work claimed
- necessary for the calculation of earned budget
Earned budget = (QTD – OU Qty) * DJC Rate
- Quantity at Completion (QAC)
- used to calculate the forecast value of the project – supports adjustments due to quantity variance and provisional item adjustments
Revenue at completion = QAC * Sell Rate
Budget at completion = QAC * DJC Rate
- used to calculate the forecast value of the project – supports adjustments due to quantity variance and provisional item adjustments
Contents
- 1 Creating a progress claim
- 2 Building a snapshot of lot quantities (QA Backed claims only)
- 3 Navigating your progress claim
- 4 Updating your progress claim
- 4.1 Changing claim properties
- 4.2 Changing claim quantities
- 4.3 Updating a claim after changing the lot register or lot quantities
- 4.4 Updating a claim after changing the schedule
- 4.5 Changing the type of a schedule item
- 4.6 Changing which statuses are included in a QA backed claim
- 4.7 Automatically setting the certified quantities
- 4.8 Importing quantities from other claims
- 4.9 Setting a split date
- 5 Progress claim functions
Creating a progress claim
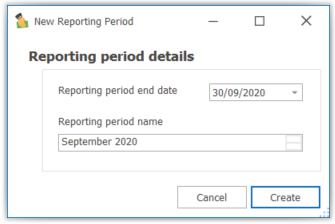
To create a Progress Claim you must first have set up a report period corresponding to the period covered by the Claim. If you are using the Daycost or Invoice modules, you will most likely have created one already. If not, simply click on the New Report Period button in the bottom toolbar of the Progress Claim Register and add a name and date for the period. Click Create.
Once you have a report period, double click on the Report Period in the Progress Claim register. If a Claim has already been initialised, then the Claim will be displayed in a new window. If not, you will be prompted per the screenshot below. Complete and click Next.
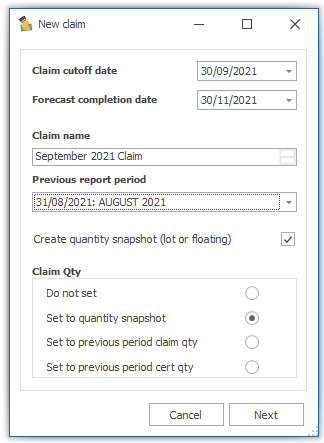
The fields for the new progress claim are:
- Claim Cutoff Date – the date used as the cut-off for the progress claim
- Claim Name – a descriptor for the claim. Civil Pro will make a suggestion for you if you update the cutoff date. You can change it.
- Previous Reporting Period – the reporting period immediately prior to this one. The certified quantities from the previous period will be used to calculate the ‘this month’ (periodic) values. If this is the first claim for the project, then leave this field null.
- Create Quantity Snapshot – select if you are tracking Lot Quantities and wish to use them to calculate your Quantity to Date.
- Claim Qty – these options set the values for the Claim quantity for each item in the claim (if you need to do this after creating the Claim, this can also be done then using the functios in Claim Operations).
If you did not select to use Lot Quantities in the screen, then the Progress Claim will be created and opened.
If you are using Lot Quantities, then there is one more step as Civil Pro builds a snapshot.
Building a snapshot of lot quantities (QA Backed claims only)
Lot Quantity information changes throughout the project, but it is important that the information used to create the Claim remains unchanged (unless we deliberately update it). We call the process of taking a copy of the Lot Quantity data for the purposes of each Progress Claim taking a Quantity Snapshot. This is most commonly done during the Claim creation process, but is easily updated later if you need to. When creating your new Claim, if you selected to use Lot Quantities, the following form is shown as per below. Complete relevant information/checkboxes and click Create.

- Claim Cutoff Date – this is the same date from the previous form – repeated from the previous form for reference
- Show Only Quantities up to Cutoff date – selecting this will mean that any lots not having the required status at the cutoff date will not have their quantities included in the snapshot.
- Set Claim Qty to Snapshot – when the snapshot has been created, the quantity for each Schedule Item will be set to the sum of its Lot Quantities only if this is selected.
- Include Open / Guaranteed / Conformed Lots – dictates which Lot Quantity statuses are included when calculating the quantity for each Schedule Item.
Note: The snapshot will include every Lot Quantity for Lots of all status up to the cutoff date (or beyond if not selected), regardless of what statuses are included. The status options are only used for calculating the total of each Schedule Item.
When you create or open your Progress Claim, you will see your Schedule on the left, and a collection of numeric totals on the right.
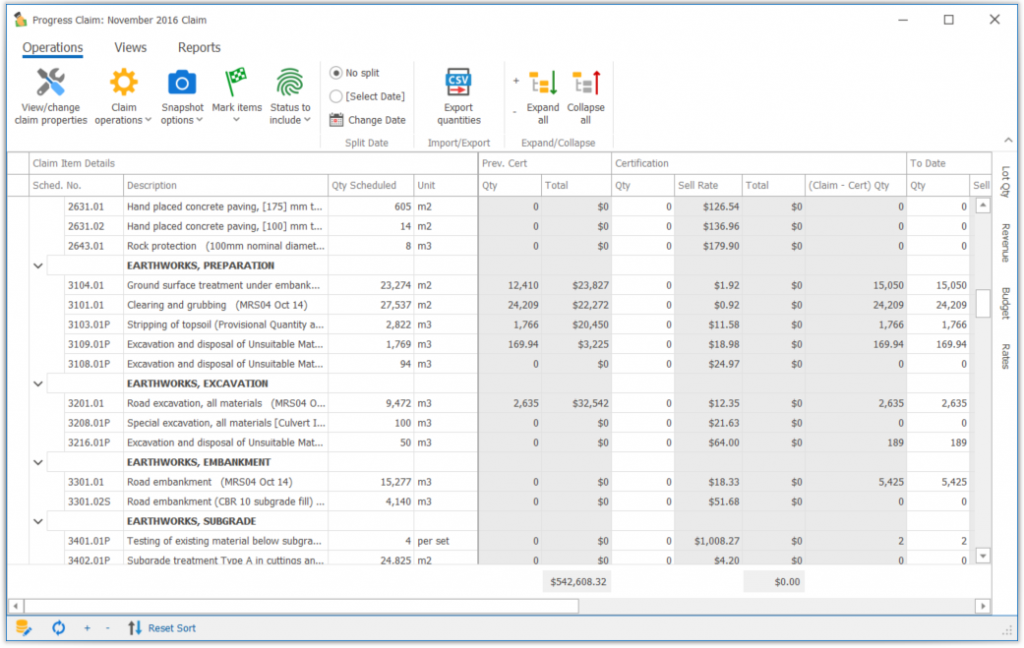
The majority of columns are either originate from the Schedule or are calculated. These are greyed out and not editable. The editable columns in the default Progress Claim view are the Qty to Date and the Certified Qty. To update either or these Quantities, simply Enable Editing and update the grid directly.
Tip 1: The Register Menu (bottom toolbar) includes a + and – button. If your Schedule has a nested structure, these collapse all / expand all items in the Grid.
Tip 2: The Progress Claim is ordered in the same way as the Schedule. If you sort by another column in the grid and need to restore the original order, use the ↑↓ button in the Register Menu.
Summary panels
In addition to the grid, there are other panels which auto-hide by default. These are accessed from the bar to the right of the grid by clicking on the relevant heading and change to reflect the information for the currently selected Claim Item.
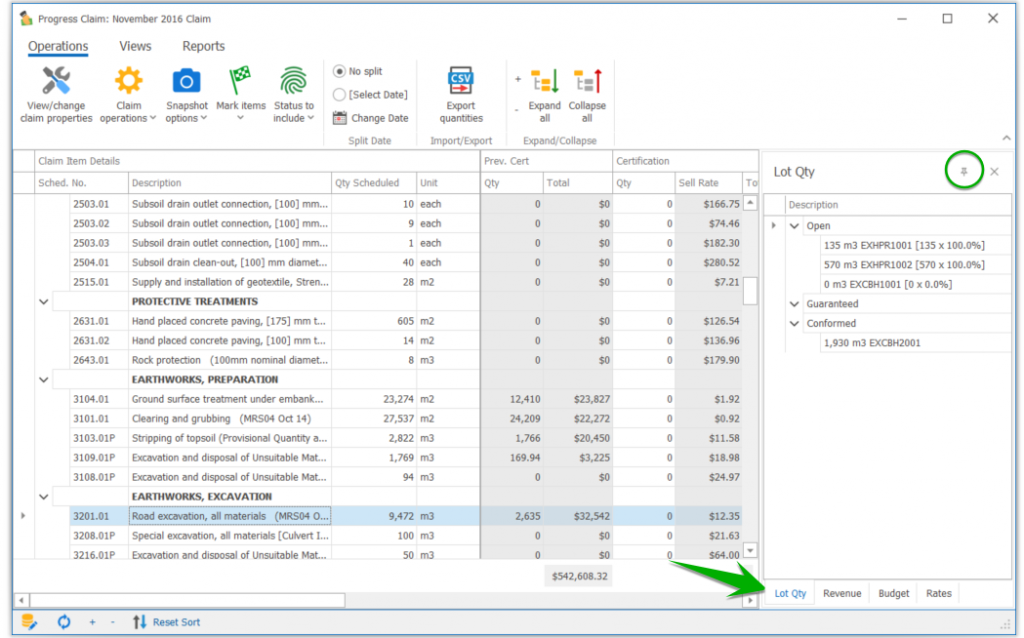
If you are using QA backed Claims, the most commonly used of these will be the Lot Qty Panel which shows which Lot Quantities support the Claim Quantity, and what their status is as shown in the screenshot below.
These panels can be pinned to prevent auto-hiding (which keeps the panel open) by clicking on the pin in the top right.
Pre-baked and custom views
Like most Civil Pro Registers, there is a lot more information than is first shown in the Claim when it is opened. The default view is simply the information that the majority of users will want to access most of the time, with the other information hidden. Civil Pro provides a collection of pre-baked views which automatically change which information is visible. These are accessed from the Context Menu.
The available views are:
- Standard – shows the previously Claimed, Certified and Claim Qty columns, and corresponding values. Also includes the difference in Claim value calculated for the current claim less the previous one (Diff).
- Min – shows the previously Claim and Claim Qty columns, and corresponding values, and Diff values.
- Earned – shows the Qty to Date, O/U Qty adjustment and the Actual Qty (Actual Qty = Qty to date – O/U Qty), and totals to date and for the current claim.
- Forecast – shows the Qty to Date and Value to Date, as well as the Quantity at completion, Sell Rate at completion and Total Value at completion.
- Budget – shows the Prev Qty, Qty to Date, Over/Under, Actual Qty, Forecast Qty with matching DJC Rates and totals.
- All – shows all the data columns.
If you want to customise to a non standard view, you can use the column chooser accessed by right clicking on the dark grey column headers. If you want to save this as your own view, the process is as described in the help topic on Custom Views.
Updating your progress claim
Note: Your Claim cannot be edited if it is locked. To unlock a claim, select it in the Progress Claim Register and use the Toggle claim lock option in the Context or Ribbon Menu.
Changing claim properties
To change the basic Claim properties such as the Claim name, cutoff date and previous Claim:
- Use the View/Change Claim Properties option in the Ribbon Menu.
- In the form, update the required information. Click Update. Note: changing the Claim Date will not update your snapshot. Use the update snapshot function to do this. Click Next.
- Your claim will be updated if necessary (if you changed the previous report period).
Changing claim quantities
If you are using a QA backed Progress Claim, then the Quantity to Date can be automatically set to the sum of your Lot Quantities when you create the Claim, or later if you re-take a snapshot, or rebuild the Claim. You can then edit the QTD or any of the other quantities manually.
If you are not using a QA backed claim, then all quantities are manually entered.
To change quantity manually:
- Enable editing.
- Ensure the Claim is not locked. You can unlock a Claim using the Context Menu or Ribbon Menu.
- Update Quantities directly in the grid.
Updating a claim after changing the lot register or lot quantities
If you have made changes to your Lot Register or Lot Quantities, you can update the snapshot using the Renew Quantity Snapshot function from the top grid’s Context Menu. This will not update the Quantities in the Claim itself unless you answer yes to the prompt Do you want to update the claim quantities to match the updated snapshot? which occurs during the update.
- Select the Claim Operations => Renew Quantity Snapshot function from the Context or Ribbon Menu.
- If you already have a snapshot, you will be prompted to advise that the snapshot will be overwritten and asked to confirm.
- You will see a new form like the one used to create a snapshot for a new Claim.
- Select the appropriate options – the options are described in the Building a snapshot of Lot Quantities Topic.
- If you have the set the Auto-Unguarantee Option in the Project Options, you will be prompted whether to Unguarantee Lots.
Updating a claim after changing the schedule
When you create a claim, a copy is made of the schedule. This ensures that if changes are made to the Schedule for future Claims, then it does not change the previous ones as well. As a consequence, if you make changes to the schedule you will need to update your Claim.
Examples of where this may be required include:
- adding a new Schedule Item (usually for a Variation)
- changing the description, schedule number etc. of a Schedule Item (again usually due to a Variation)
- Changing the structure or order of your schedule
To rebuild your claim:
- Select the Claim Operations => Update Claim Items from Schedule
When the Add option is selected, any items that have been added to the schedule (usually variations) will be retrieved and added to the Progress Claim. Any items that are added will have their claim quantity set in accordance with the option in the New Item Claim Quantities selector.
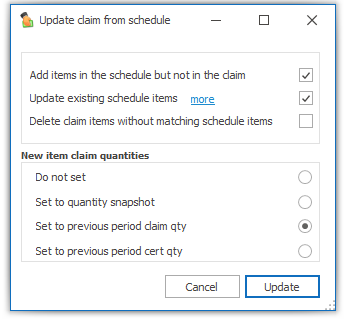
When the Update option is selected, any items that exist in both the schedule and the claim will be updated in the claim. No quantities or rates are changed by this function, only the schedule number, description, units and metadata associated with ordering and structuring. If you want to update rates or quantities from the schedule, there are dedicated Claim Operations functions for this.
When the Delete Claim Items option is selected, any items in the claim that are no longer in the schedule are removed. It is not expected this is an option you would select often.
Changing the type of a schedule item
As explained in the Progress Claim Concepts topic, Claim Items and Schedule Items are of types:
All Schedule Items are either:
- Fixed Rate or Variable Rate and
They can also be:
- Not Claimed or Claimed
You can tell the type of a Claim item by its shading. Cells for items of each type are coloured as follows:
| Fixed Rate | Variable Rate | |
| Claimed | White | Blue |
| Not Claimed | Green | Yellow |
To change the type of one or more Schedule Items, select them and use the appropriate option from the Mark Items submenu. You will be prompted whether to reflect the change in item type back to the Schedule. Generally you will want to do this to ensure the type is maintained in future Claims. Previous Claims will be unaffected unless you rebuild the Claim.
Changing which statuses are included in a QA backed claim
When a new snapshot is created during the New Claim process, and when updating a Claim after changing Lot Quantities, the user can select what statuses (Open, Guaranteed or Conformed) are included in the Claim. Regardless of what options are selected, the snapshot will include all Lot Quantities regardless of status – the included statuses simply limit what is shown and included in the Claim. All of the other data is hidden in the background. This is to allow the user to change what statuses are included in the claim without having to rebuild the snapshot (although you can if you need to refer to updating a claim after changing lot quantities).
In order to change the included Lot statuses for a Claim without rebuilding the snapshot:
- Select the Status to Include submenu in the Context menu. In the screenshot below you can see that Open Lots are not included, but Guaranteed and Conformed Lots are.
- Click on a Status to include/exclude it.
Automatically setting the certified quantities
Generally, a Progress Claim has to be certified by the client’s representative prior to payment. The Quantities may differ to those submitted in the Claim. In order to be able to track real revenue and subsequently, the total Claimed between one Claim and the next, Civil Pro needs to be updated with the Certified Quantities. While you can simply enter this Quantities directly into the Claim, there is generally an easier way to do provide them.
While the Certified Quantities usually differ to the Claimed Quantities, the majority of Quantities claimed will be the same. To take advantage of this, you can set the Certified Quantities as equal to the Claimed Quantities, and then just update those that are different.
To set the Certified Quantities as equal to the Claimed Quantities:
- Select the Claim Operations => Set Certified = Claimed function from the Context Menu.
- Your Claim will be updated.
Importing quantities from other claims
While each Claim will usually have different Quantities, many of the Quantities to Date may remain the same because:
- The Schedule Items to which they refer are complete.
- No work was undertaken on those items during the month.
- The items have not commenced.
As a result, it is often useful to set the Claim to Date (or other Quantities) to the same value as a previous Claim as a starting point, then update those Quantities that need updating. This is of course much more useful if you are not using QA backed claims where the Quantities are calculated for you.
A shortcut for this is included in the New Claim process with the Match claim QTD to Previous Checkbox which is available if you do not select to use QA backed claims. You can access a more powerful version which allows copying various different Quantities from a previous Claim from the Progress Claim’s Context Menu. Copying of the following is supported:
- Qty to Date – set to either previous Claim’s Qty to date or certified qty
- Qty Certified – set to either previous Claim’s Qty to date or certified qty
- Qty at Completion
- Over/Under Qty
- Security and Retention Values (copy happens at the reporting period level)
To import quantities from other claims;
- Select the Claim Operations => Import from Previous function from the Context Menu.
- An Options form will be displayed. Select the Claim you want to copy from, and the data you want copied.
- Click OK – your claim will be updated.
Setting a split date
You can set a split date by entering it in the date editor in the Ribbon Menu. Adding a split date summarises the Lot Quantity information prior to the split date. This is to prevent creating massive reports with significant overlaps of data every month. The split date is commonly set to the date of the previous claim. This ‘rolls up’ all the previous Lot Quantities, and lists those Lot Quantities after the date in Lot-by-Lot detail. Totals are performed for Guaranteed and Conformed Lots separately. Open Lots are not summarised.
The date used for each Quantity to determine whether or not it should be split is the latest of:
- The date the lot quantity record was last modified.
- The conformed date (for conformed lots) or guaranteed date (for guaranteed lots).
Tip: To clear the split date (or any lookups in Civil Pro), use the Ctrl + Delete keys.
Progress claim functions
Unless noted otherwise, these functions are accessed from the Context Menu or Ribbon Menu.
Snapshot incl. description
If you want the description of the Lot included in the text of each snapshot line, then select this option. This does not need to occur prior to the generation of the snapshot. The description will also be included with any Lot Quantity reports.
Show cents
By default, the Progress Claim does not show cents for the total columns. If you need to show cents, use the Show Cents switch in the Context Menu.
Reporting
Civil Pro provides many different reports for viewing your Claim and financial performance, you should find a standard report for pretty much any purpose, but if you don’t – remember you can always create a custom report. Reports are accessed from the Reports submenu in the Ribbon Menu.
Note: By default all Claim presentation reports and the Lot Qty Report(Val) use the Claim Quantity to Date. You can change these reports so that they use the Certified Quantity by using the Use Certified Qty in Reports toggle switch in the Reports menu.
Claim presentation
- Progress Claim Cover – shows a one page summary for the Claim including the amount claimed, adjustments for security, retention and previous payments, and the amount claimed (+ GST amounts).
- Progress Claim – shows each Schedule Item in the Claim with Schedule Qty, Quantity claimed, sell rate and total value.
- Progress Claim Detail – adds columns for previous Certified Qty and Amount, and This Claim Qty and Amount to the Progress Claim report.
- Claim – Completion – adds columns for to Complete Qty and Amount, and At Completion Qty and Amount to the Progress Claim report.
Lot Qty
- Lot Qty Report (Val) – shows each Schedule Item in the Claim and the Lots (by status) which support the Claim. Includes the qty and value of each Lot.
- Lot Qty Report (No val) – shows each Schedule Item in the Claim and the Lots (by status) which support the Claim. Includes the qty of each Lot only.
Cost vs. Revenue
- Cashflow – A summary of the forecast incoming monies vs outgoing costs for the current period and to date. This reports:
- Revenue which is based on the Claim’s sell amounts, less any cash security and retention.
- Costs are calculated from the Daycosts Register.
- Free Cashflow = revenue – costs
- Risk – any overclaim included in the revenue or Supplier invoices in dispute
- Reconciliations – compares the Daycost totals with the invoice totals.
- Profit and Loss – a summary of the earned budget vs costs for the current period and to date. This reports:
- Budget – which is based on the Claim’s djc amounts adjusted for overclaim.
- Costs are calculated from the Daycosts Register.
- Profit / Loss = budget – costs.
- Reconciliations – compares the Daycost totals with the invoice totals.