Civil Pro Mobile’s approval system allows users to electronically record the process of gaining 3rd party approval for quality assurance functions such as;
- Checklist Items (Hold points / Witness points)
- Non Conformances
- Authorities to proceed
As of the initial release of Civil Pro Mobile, the checklist items and NCRs have been implemented, with ATPs scheduled for June 2017.
Contents
How the Approval System works
The principle of the approval system is relatively straight forward. When a record in Civil Pro requires approval – for example a hold point on a checklist, the user can easily generate a request which is recorded in the system, and emailed to the approver. The email contains two different methods for approving (or not) the request;
- The approver can click on the link which will open Civil Pro Mobile – even on a desktop computer. Once logged on, the approver either approves the item, conditionally approves it, rejects it or requests an NCR; or
- Within the request email there is a unique approval code revealed on to the approver. If the approver is happy to approve the record, they simply quote the 4 digit code to the requester. Entering this code into Civil Pro for the record will mark it as approved.
Generating a request
To generate a request, use the Request Approval link from the context menu of the item you need approval for. For example;
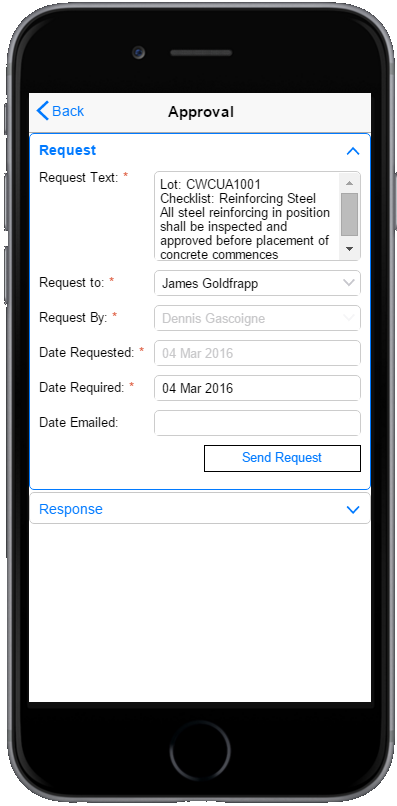
When the approval request is initiated, simply complete the required fields;
- Request Text – filled based on the item you are requesting – but can be edited
- Request To – select from the list of users with approval permission for your current project (Requires NCRApprove or ITPApprove permissions)
- Request By (read only) – auto-populated with the currently logged in user
- Date Requested (read only) – auto-populated with the current date
- Date Required – select a date by which you need a response
- Date Emailed (read only) – automatically populated with the date on which the email is sent.
When you click on the send request button, an email will be sent to the person the request is to. A copy of the email is also sent to the requester, but it is missing the approval code (refer below)
The request email
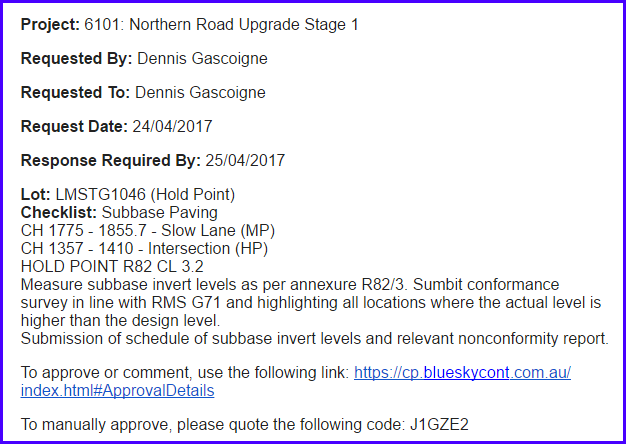
The request email will look something like the below screenshot – it also has a pdf report of the relevant document – e.g. an NCR or the checklist the item is from. Looking at the email, you will see that the approver has two options. They can either;
- click the link and go to the mobile site (on any device). Log on, and enter the approval details (refer following section) or;
- quote the approval code to the requester, who can then enter it using either the desktop application or the mobile site.
Approvals – Completing a response
By logging on to the mobile site
After receiving a request for an approval, the approver logs on to the mobile site (they will only be able to see the approval part of the site unless you give them additional permissions). If they used the link in the email, they will be taken directly to the relevant approval item. If they log on to the main site, they can use the approvals menu item to see a list of all of their approval requests.
The approval screen is the same screen as that from which the approval was requested (see above), except the second Response pane is now visible by default. The approver enters their response (either approved, conditionally approved, not approved or NCR required), and any necessary additional information in the text field.
Using an approval code
When the approval request email is sent, a unique approval code is included (this is omitted from the cc email). If the approver cannot get to the mobile site, or it is otherwise more convenient, then they can quote this code to the person who requested the approval, and they can enter it on their behalf. As only the approver has this code, it is evidence that they approve the request.
The approval code can be entered on the mobile site at the same page as a normal approval response is completed (refer above topic) by clicking on the Approve with code link. It can also be entered into the desktop application by selecting the Approve with code function from the Approvals context menu. This menu is accessed by right clicking on the approval in the register or in the detail popup.

