A new project is created from the Connection page (accessed by clicking Select Connection from the login page).
After selecting the SQL Server option near the top of the form the Connection page looks like this;
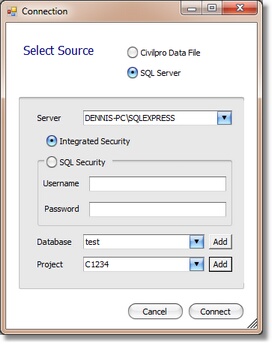
To create a new project;
| 1. | Select the server from the top drop down box. You will be prompted for Civilpro to search the whole network. If your server is on a network network, you need to say yes if you want civil pro to find it automatically. You would answer no if the server is on the local machine, or you know the server name and are typing it straight into the drop down instead of selecting it. |
| 2. | After selecting your server, you need to enter your credentials to access it. The type of security will depend on how your server is set up. Get these details from your SQL server administrator. |
| 3. | Once the correct credentials are added, selecting the database drop down will populate it with the available databases on the server. Select an available database or click add and enter a name (no spaces) for a new one. |
| 4. | Click the Add button to the right of the project drop down and enter a new contract number and project name. |
| 5. | Click Connect |
If your project is also in a new database, the new database initialization will begin, followed by the project initialization. If this is a new project in an existing database, only the project initialization is required.
Once complete, click on connect and you will be returned to the log in screen.