A Lot is a defined activity or parcel of work. It may describe (for example):
- a layer of pavement between two chainages over a specific date range,
- commissioning of an electrical cabinet
- the installation of subsoil drains along a service road
- a concrete pour on a bridge abutment
- the preparation of project management plans
- any identifiable work or process
Each lot is uniquely identified by its Lot Number.
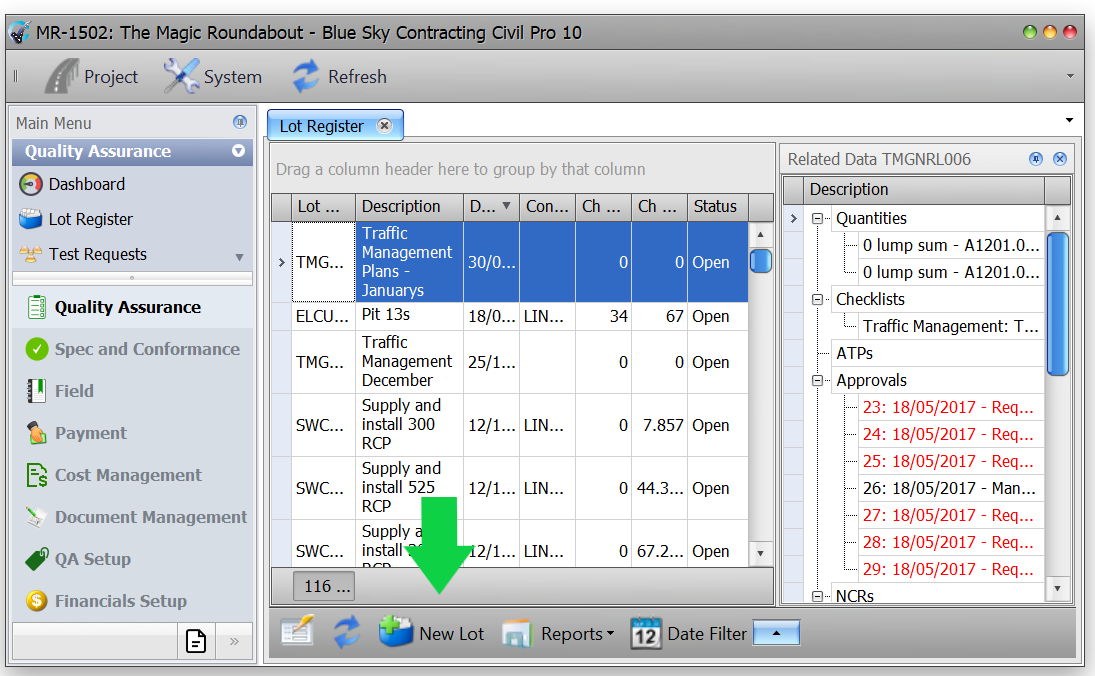
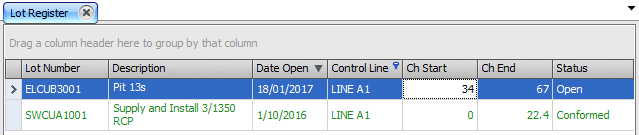
The Lot Register is accessed from the Quality Assurance section of the Main Menu.
The Lot Register contains all of the Lots defined for a project and is at the heart of the Civil Pro system. The majority of records will have at least one link directly to a Lot. You can see all of the relationships that a Lot has by inspecting the Related Items Panel as you click on each Lot in the Register.
Contents
Lot Fields
Several fields describe the lot, its progress, and when key events have occurred:
- Lot Number – the unique identifier for a Lot. Usually created using the Work Type and Area Code parameters, but can be customised
- Work Type
- Area Code
- Control Line
- Description – a text field providing narrative to assist classifying a Lot. For example, Concrete pour right hand abutment – Narrows Bridge
- Raised By – the user who created the Lot record (automatically assigned)
- Date Open – the date the Lot was created (automatically assigned)
- Date Work Started
- Date Work Complete
- Date Guaranteed – a Lot can be Guaranteed if the user is confident it meets the Specification, but some evidence remains outstanding (such as 28 day concrete results). A Lot is considered to be Guaranteed if it has a Guarantee Date, and no Conformance Date
- Date Conformed – the date the Lot has been assessed as conforming with the Specification.
- Status – the Lot Status is a calculated field and cannot edited directly. One or more Lot’s status can be set to Guaranteed or Conformed using the functions in the Context Menu. A lot is considered to be;
- Conformed – if a Conformed Date is set
- Guaranteed – if a Guaranteed Date is set but no Conformed Date is set
- Open – no Guaranteed Date or Conformed Date
- Rejected – a Rejected date is set
- Conformed By – the user who Conformed the Lot
- Date Rejected – if a Lot is Rejected, this records the date that assessment was made. A Lot with a Rejected Date has a status of Rejected
- Percent Complete – the proportion of a Lot that has been finished for the purposes of payment. This property is ignored for Conformed and Guaranteed Lots which are assessed to be 100% complete by definition
- Chainage Start; Chainage End; Left/Right Offsets – these parameters define a Lot’s geometry when Chainage Geometry is selected for the Lot (refer below)
- Nominal Thickness – a measurement of the thickness of a Lot used for automatic calculation of volume
- RL1/RL2– a text field defining the vertical position of the start/end of a Lot. This can either be a numeric datum, or a text descriptor such as SG, subgrade, natural surface etc
- Lot Area, Volume, Length (AVL) – fields calculated by Civil Pro based on the Lot Geometry where such a calculation is possible. These properties can be manually overridden (AVL Override)
- Notes – a text field for providing addition information about a Lot.
- Primary Tag – available only if the Project Option for Primary Tags is set
Adding a new lot
To create a new lot, click on the New Lot button in the Register Menu. This will start the New Lot Wizard. As with all Civil Pro forms, only the coloured fields are compulsory.
TIP: Holding down the shift key while clicking a New Lot, or using the New Lot (Like Existing) option from the Context Menu starts the New Lot Wizard pre-populated with data from the currently selected Lot. Use this function if you have to create a new Lot that is very similar to an existing one. For example a new layer of embankment, or ground surface treatment over an existing topsoil strip lot.
The new lot wizard
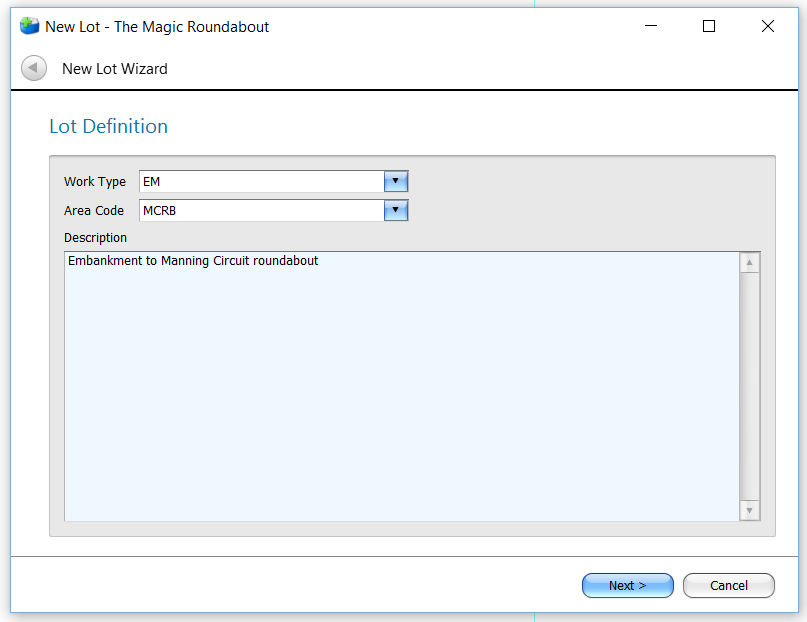
- When the New Lot Wizard starts, you will be prompted to specify the Work Type, Area Code and a description for the Lot. Enter the data and click Next.
- In the following screen, you will see Civil Pro has calculated the Lot number for you. For more information on how this is done and on customizing the number, refer to the Lot Numbering help topic. Other information requested on this screen includes:
- Raised By – this is set to the current logged in user
- Date Lot Opened – the date the lot is created (the current date)
- Date Work Started – when did work actually start on the Lot
- Level of Testing – used to specify which testing regime (as defined in the ITP testing) is required
- Geometry – if there is Geometry for the Lot, how is it defined
- No Geometry – there is no physical location defined for the Lot, or the location is defined in the Lot Description
- Chainage – the Lot is defined using Chainage and Offset to a Control Line
- Coord. Position – the Lot is defined using one or more single coordinate points – for example an easting/northing
- Coord. Region – the Lot is defined by a shape, the vertices of which are coordinates

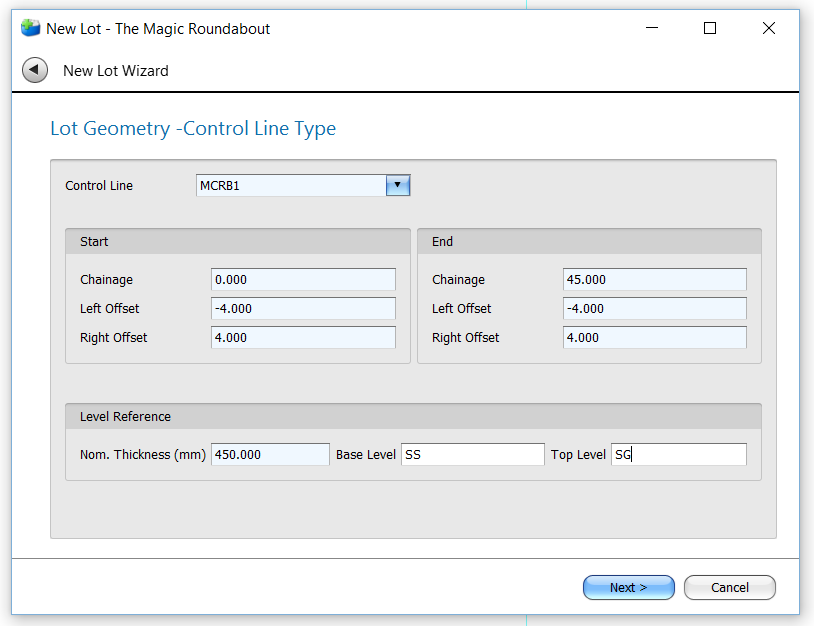
- The next screen defined the Lot Geometry and will depend on which geometry model was chosen in the previous screen. If you chose a Chainage Geometry, you will be prompted to enter Chainage, Offset, Control Line and Level References. Enter the required information and click Next.
If you have chosen either coordinate position or coordinate region for the Lot Geometry, the Geometry Definition page will look like the below screen.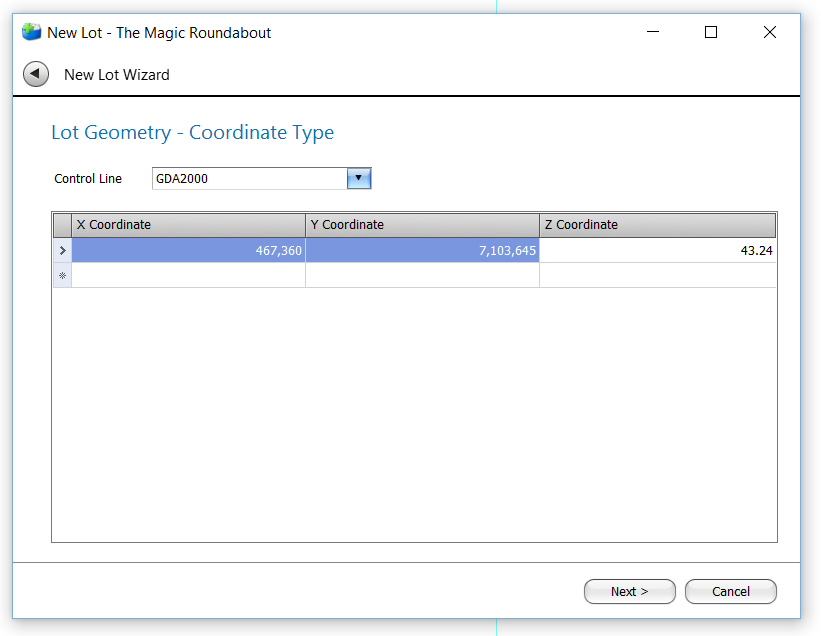
- Calculations of the Lot Area, Volume and Length are made from the provided geometry if possible. If Civil Pro has insufficient information to calculate the geometry, or the Lot is an irregular shape and you have more accurate estimates, then you can override the calculations. Simply click on the AVL Override check box (Area, Volume, Length override) and enter the correct values. Click Next.
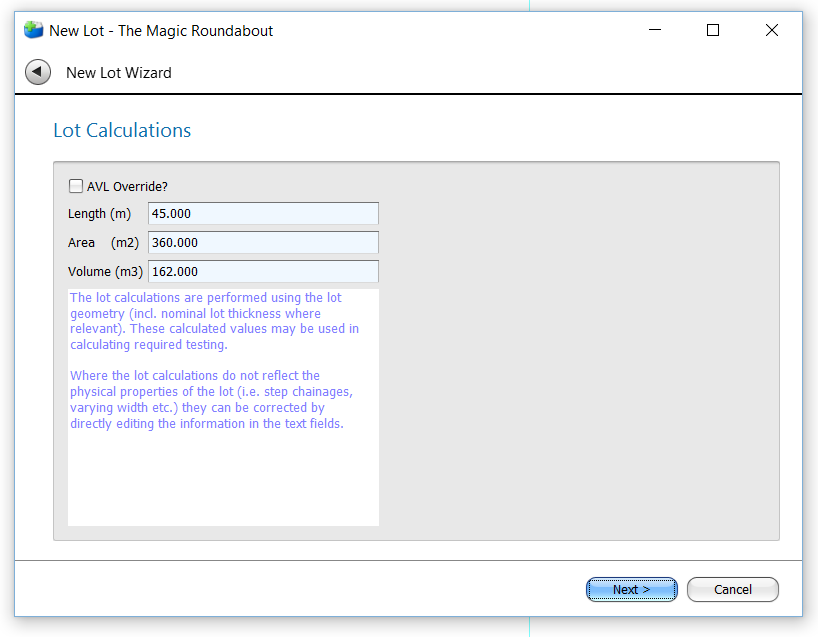
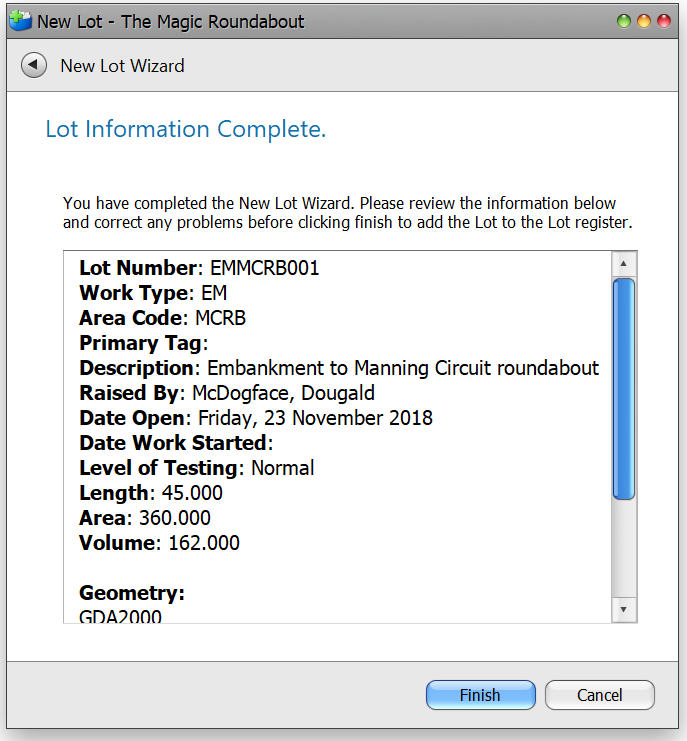
- Review the summary and either click Finish to complete the lot, or click the back arrow button in the top left to return to previous page.
Updating a lot
To update a lot, either:
- Enable Editing using the button at the left end of the Register Menu, or use the Context Menu option to do the same. Then directly update data in the grid.
- Update any field directly in the Detail Panel. If the Detail Panel is not visible, double click any record to show it.
Updating the lot number
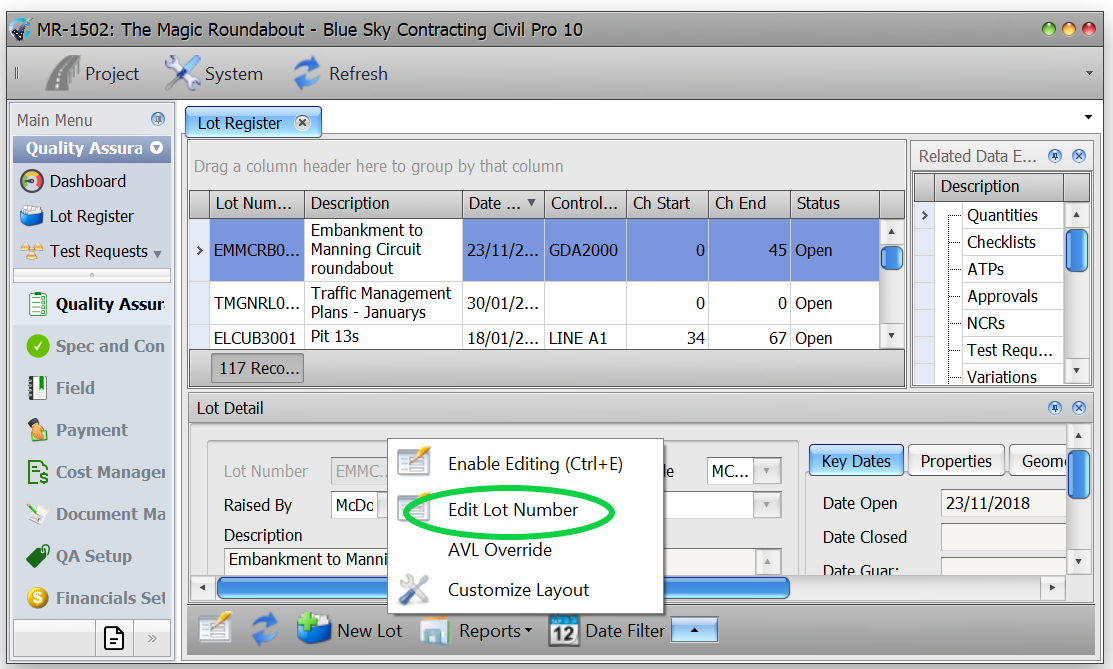
If you need to edit the Lot Number for a lot, this can only be done using the Detail Panel:
- Invoke the Context Menu for the Lot Detail Panel (right click on any of the grey area in the Detail Panel).

- Select the Edit Lot Number function,
- Edit the Lot Number to the desired, unique lot number.
Updating the length, area and volume
The Area, Volume, Length properties are automatically calculated by Civil Pro. If the Geometry is not defined, or a complex shape that Civil Pro cannot parse, then you can set these properties manually. If you did this when the Lot was created, then you can simply update them in the Detail Panel on the Properties tab. If you did not specify to override the properties when the Lot was created, you will need to unlock the editors by selecting AVL Override from the Lot Detail Panel Context Menu (right click on the grey part of the detail panel).
Deleting a lot
To delete a lot:
- Enable Editing and select the Lot to delete
- Press the delete key
While Civil Pro can generally identify all related records and remove them along with the Lot, it is still possible that Lots may fail to delete because of these links. In this case, remove the links and try again.
Related Items
Most of Civil Pro’s records can be linked to a Lot. The majority of these links are created in the same way and function the same way as other links in Civil Pro, but the Lot Quantities, Checklists, Documents and Test Request behave a little differently. The Related Items for each Lot are shown in the Related Items Panel to the right of the Lot Register. If the panel is not visible, you can add it using the Context Menu’s Show Related Items function.
Lot quantities
Lot Quantities are a record of what Quantity of each Schedule Item has been executed in the completion of work on a Lot. These quantities can be used simply for the purposes of record keeping, but are also used in the preparation of Progress Claims for payment.
Adding a lot quantity
To add a lot quantity:
- Double click on the Lot Quantity heading in the Related Items list.
- In the Schedule Items Selector popup you will see the list of your Schedule Items. If you have created Schedule | Work Type or Schedule | ITP links the list may be filtered. You can change the filter or search for Schedule Items by pressing CTRL+s, or clicking on the Customise button on the right of the Schedule Item Selector Panel.
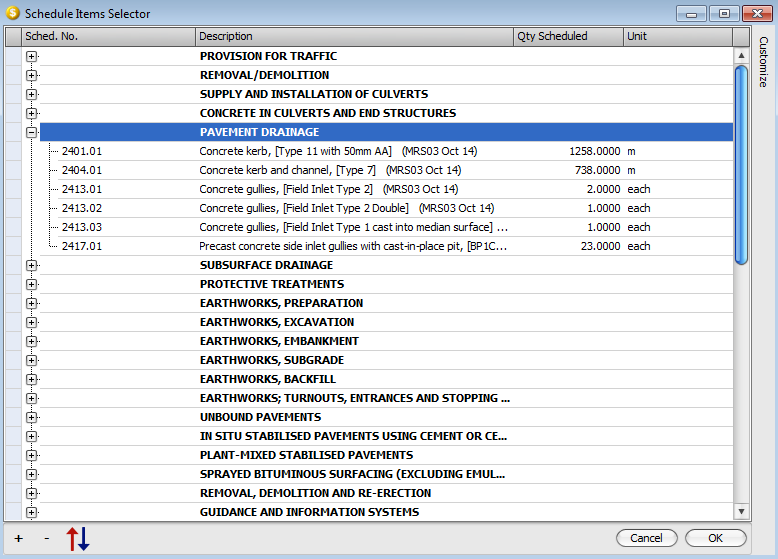
- To add a Quantity, double click a Schedule Item, or drag and drop several items from the Schedule Items Selector Panel over to the Schedule Items heading in the Lot’s Related Items Panel.
This has now created a new Lot Quantity. The Quantity is set to zero, but is easily updated.
Updating a lot quantity
To update a Lot Quantity after it is added (or at any time):
- Select the Lot.
- Right click on the Quantity in the Related Items Panel.
- In the Edit Quantity Panel, select the option to either Update the Quantity to the Schedule Quantity; Remaining Quantity, or specify a quantity.
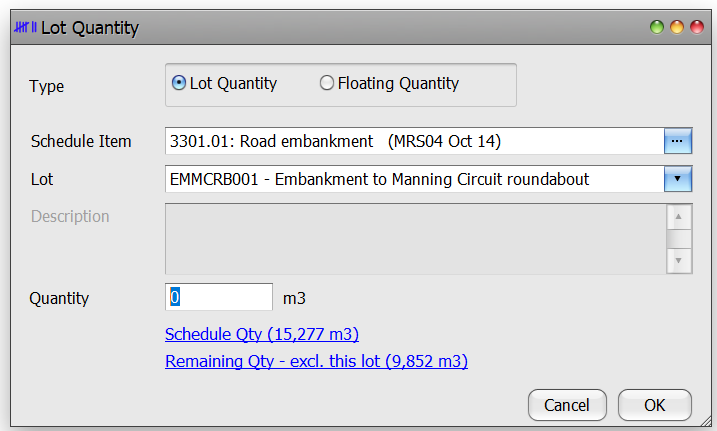
- Click OK.
If you need to change the Schedule Item for a Quantity, simply delete it and add it again with the correct Schedule Item, or change it in the Lot Quantity Panel (refer below Advanced Quantity Properties).
Deleting a lot quantity
Unlike with most other links, deleting a Lot Quantity actually deletes the whole Lot Quantity record, not just a link between the Lot and the Quantity. To delete a Lot Quantity, select it in the Related Items list, and press the delete key.
Advanced quantity properties
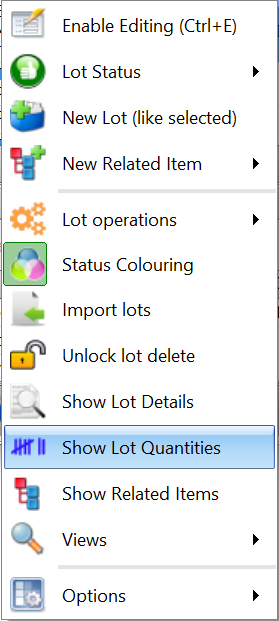
Civil Pro provides additional properties for the advanced management of Lot Quantities. The majority of the time these are not required, but when they are they can be accessed by:
- double clicking on an individual Lot Quantity, or
- selecting the Show Lot Quantities option from the Context Menu
The Lot Quantity Panel will be shown under the grid instead of the Lot Detail Grid. All Quantities for the Lot selected in the Register Grid will be displayed.
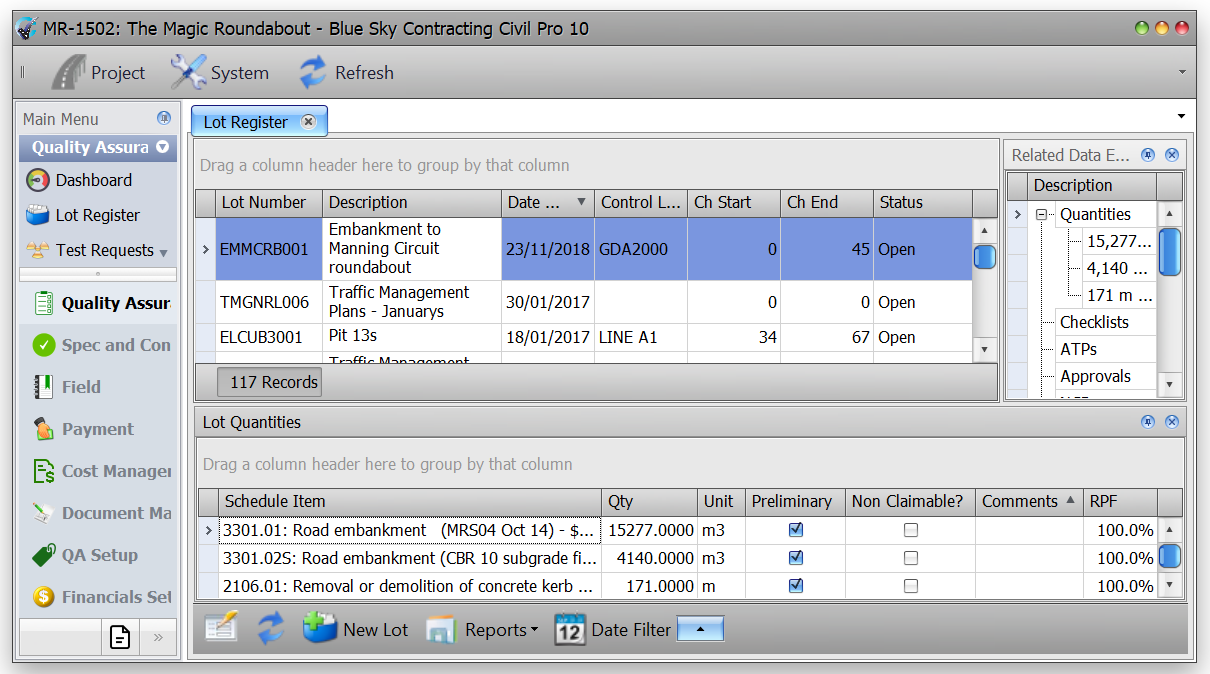
In addition to basic properties such as the Schedule Item, Quantity and Unit, further properties are displayed and can be edited:
- Percent complete – defaults to 100% and is used in the calculation of the Effective Quantity (refer to the Progress Claim topic)
- Preliminary – defaults to “true”. This is a marker tag only and is not used for calculations in Civil Pro
- Non-Claimable – defaults to “false”. Quantities with this tag are not included in the Progress Claim calculations
- Comments – a free text field
- RPF (Reduced Payment Factor) – defaults to 100% and is used in the calculation of the Effective Quantity (refer to the Progress Claim topic)
Checklists
Adding a checklist
- Select the Lot.
- Double click on the Checklist heading in the Related Items List.
- In the ITP/QVC Selector popup you will see the list of your Specifications/ITPs. If you have created Schedule | Work Type or Schedule | ITP links the list may be filtered. You can change the filter or search for ITPs by pressing CTRL+s, or clicking on the ITP Customiser button on the right of the panel.
- Double click on the required Checklist, or drag and drop several items from the ITP/QVC Selector panel over to the Checklist heading in Lot’s Related Items List.

Viewing/Updating checklists
To access your new Checklist, double click it in the Related Items Panel. For more information on Checklists, refer to the Specifications (Inspection Test Plans) help topic.
Deleting checklists
Unlike with most other links, deleting a Checklist actually deletes the whole Lot Quantity record, not just a link between the Lot and the Checklist. To delete a Checklist, select it in the Related Items list, and press the delete key.
Filtering checklists
The Checklist Register filter ribbon appears at the top of the register.

It consists of 6 data categories that approvals can be filtered by in order to present the most relevant data to the user depending upon their requirements at the time:
- Raised by
- Closed out
- Check status
- Verify status
- Approval status
- Included approval request status
There is also an Apply button to the very right of the ribbon. This MUST be clicked after a filter selection has be made in order to bring up the required data.
Raised by
This filter allows you to search by the following:
- All users
- Current user (will appear as name of person logged in)
- Select user
- Click in the circle next to the appropriate heading (when checked the circle turns blue). If choosing the Select User option, a User Selector dialog will appear. Make a selection from the list and click OK.
- Click Apply at the very right of the filter ribbon
- Any checklist fulfilling the criteria of your search will appear in the register
Close Out
This filter allows you to search by the following:
- All
- Not closed out
- Closed out
- Click in the circle next to the appropriate heading (when checked the circle turns blue)
- Click Apply at the very right of the filter ribbon
- Any checklist fulfilling the criteria of your search will appear in the register
Check Status
This filter allows you to search by the following:
- All
- All checked
- Has unchecked
- Click in the circle next to the appropriate heading
- Click Apply at the very right of the filter ribbon
- Any checklists fulfilling the criteria of your search will appear in the register
Verify Status
This filter allows you to search by the following:
- All
- All verified
- Has unverified
- Click in the circle next to the appropriate heading
- Click Apply at the very right of the filter ribbon
- Any checklists fulfilling the criteria of your search will appear in the register
Approval Status
This filter allows you to search by the following:
- All checklists
- All approvals checked
- Has unapproved
- Unstatused request
- All requests statused
Tip: To see options for this filter, click on the down arrow next the heading name.
- Click in the circle next to the appropriate heading
- Click Apply at the very right of the filter ribbon
- Any checklists fulfilling the criteria of your search will appear in the register
Included Approval Request Status
This filter allows you to search by the following:
- Requested
- NCR
- Not approved
- Approved
- Conditional approval
- Manual approval
Tip: To see options for this filter, click on the down arrow next the heading name.
- Click in the circle next to the appropriate heading
- Click Apply at the very right of the filter ribbon
- Any checklists fulfilling the criteria of your search will appear in the register
Test requests
Test Request links cannot be added, updated or deleted from the Lot Register. The link is created when a Test Request is raised, and the Lot specified on the Test Request.
File store documents
You can attach documents of any kind to a Lot – including spreadsheets, Word documents, PDFs or images. Related documents are shown in the Related Items Panel under the heading File Store Docs. Before adding any documents (or photos) you must have the project file path set up. Refer to the Project Administration topic.
Adding a lot document
To add a document:
- Select the Lot you want to add the document to.
- Double click on the File Store Docs heading in the Related Items Panel. In the file selector dialog, click on New FileStore Doc at the bottom left of the screen and select the document required. You will be prompted to update the description which defaults to the file name.
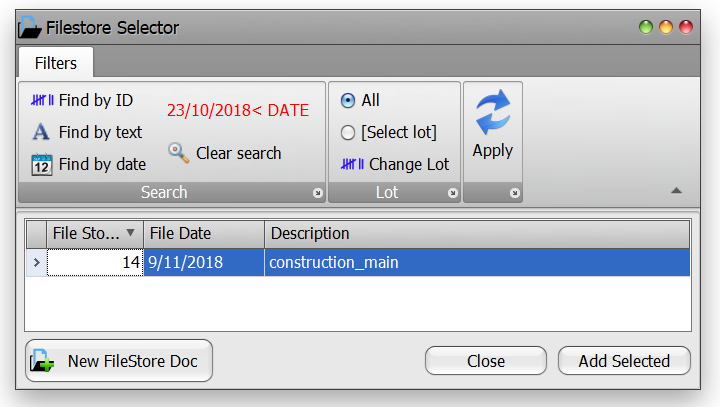
- When ready, click on OK. The document will now appear under the Related Items Documents heading for the Lot.
Updating file store document details
You can edit the details for a related document by right clicking it, and selecting Edit Document Details.
Viewing a file store document
To view the file store document, double click on the entry in the Related Items List. It will be opened with whichever program is currently set up as the default viewer for the file type.
All other Related Items are linked in the standard way as described in the Adding, Updating and Deleting topic.
Lot functions
The Lot Register has several functions for managing your Lots. These are accessed from the Context Menu, unless noted otherwise.
Lot statusing
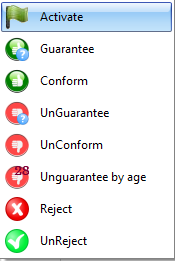
The Lot Status functions allow users to Activate, Guarantee, Conform or Reject one or more Lots easily:
- Select the Lot, or hold CTRL and select multiple lots.
- Right click one of the selected Lots and select the Activate, Conform, Guarantee or Reject options from the Lot Status sub menu within the context menu.
- Select the date from the Date Selector popup.
You will notice that there are also functions to Un-Status lots.
Lot Status => Activate
This option was added in 10.64.51 and assigns a Date Work Started to one or more lots. This is used where the project pre-opens lots before they are actually required and need to be able to quickly specify when one or more lots are actually started. One of the main uses for separating out pre-started and open lots is with statistics reporting – e.g. the dashboard. The dashboard provides an option to separate out pre-opened lots when reporting statistics. This option can be selected as required in the dashboard, or set to on by default using a project setting.
When the project setting for pre-opened lots is activated, an additional standard view is available that selects only pre-opened lots.
Unguarantee by age
One of the Status Options in the Lot Status sub menu is Unguarantee by Age. This function removes the Guarantee date for any Lot which was Guaranteed Longer than a set number of days previously.
- Select the Lot Status=>Unguarantee by Age function from the Context Menu.
- Enter the number of days after which lots will be Unguaranteed. If you have set a value for the Auto-unguarantee option in the Project Options, this will automatically populate the field.
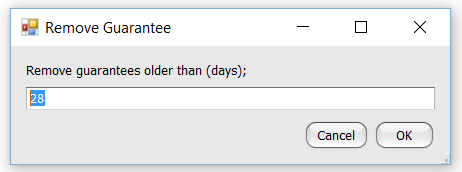
- Click OK. All lots (not just selected lots) meeting the criteria will be Unguaranteed.
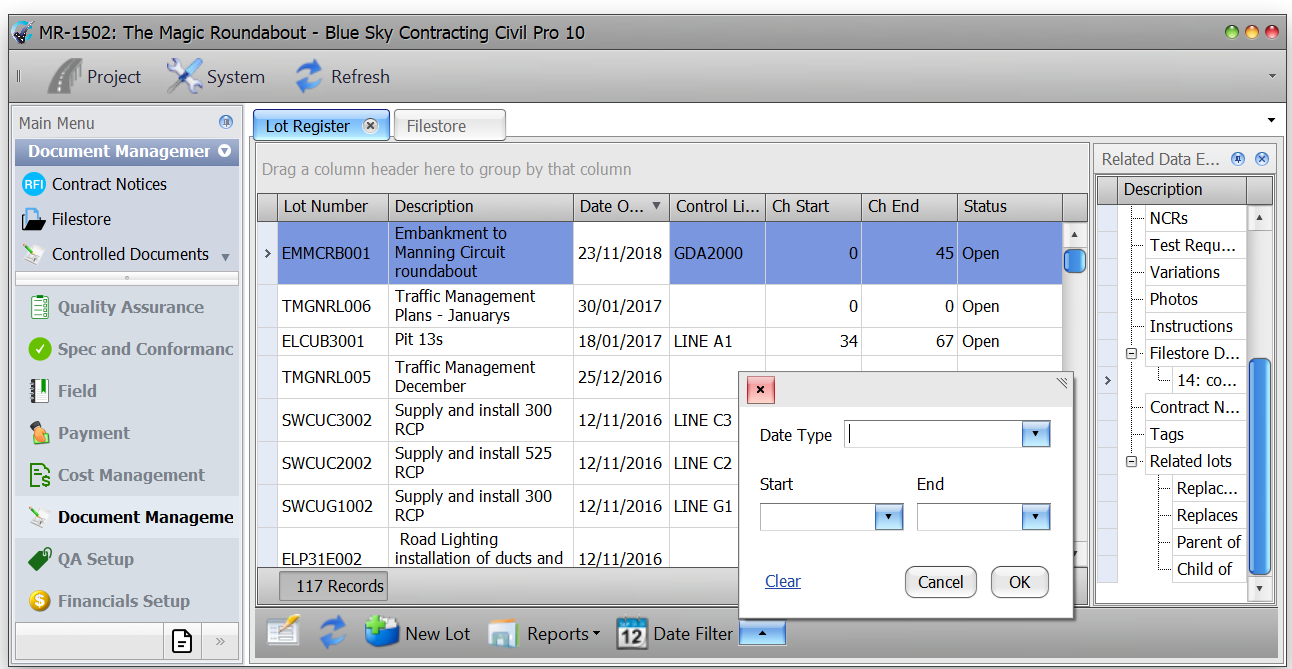
Date Filter
The date filter is accessed from the Register Menu by clicking the Date Filter Arrow button. This will display a panel in which the user can select a date range to filter the Lot Register by. The user must also select a type – either Opened, Guaranteed, Conformed or Conformed and Guaranteed. Clicking OK will show Lots with the selected date type within the specified range.
To close the dated filtered view:
- Click on the red Close button at the bottom left of the Detail Panel or
- Invoke the Context Menu, select View => Standard View.
Other Filter Options
Filtering allows you to display a subset of the records in the data source that meet a particular criteria. When filtering is applied to a Grid View, displayed records are restricted to those that meet the current filter criteria. You can filter data against single or multiple columns.
- In the Lot Grid view bring up the Filter button by hovering the mouse over the column header of the data you wish to use a the filter. A small Filter icon will appear at the top right of the header cell.

- Click on the Filter icon. A Filter drop down list will appear.
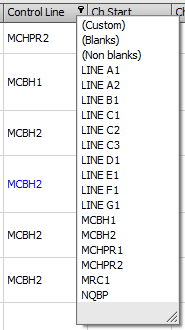
- To select the data you wish to filter by, click on the item in the filter drop down. Applying filtering to a column does not affect the filter settings of any other column.
- The Grid will then show only the records matching these selected filter criteria.
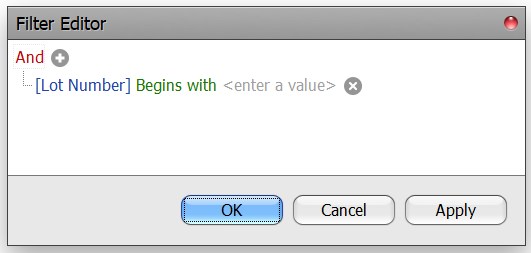
- To filter the view further, hover the mouse over the column header and right click. From the options select Edit Filter. This will bring up the Filter Editor.
- To switch between the filtered view and the standard/previous unfiltered view, click on the check box at the bottom left of the screen. Checking this box disables/enables the selected filter view but does not close it.
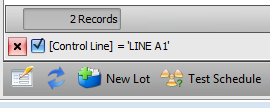
- To close the current filtered view, click on the red Close button at the bottom left of the screen.
These functions add a completely new record of the selected type, and pre-fill data to provide links back to the currently selected Lots. For example, if you choose New Related Item => New Test Request, then the New Test Request wizard will be started, with the current lot set as the test request lot. New related item records can be created for NCRs, Test Requests and ATPs. This is creating a complete new record and then linking it, not just adding a link to an existing record.
Views
The Lot Register has several pre-baked views for quickly accessing relevant data in the Register Grid. These are available in the Views sub menu of the Context Menu. You can also save your current layout as a Custom View. Pre-baked views include:
- Dates – shows the Lot Number, Description and the date fields for the Lots
- Value – shows the Lot Number, Description, Geometry and calculated columns displaying:
- Lot Value – the Lot value as calculated from Lot Quantities
- RPF Value – the value of any Reduced Payment Factors
- Lot Quantities Checkbox – a checkbox indicating if Lots do or do not have attached Lot Quantities
- Work in Progress – shows only Open lots (by applying a filter), the Lot number, Description, Geometry and Percent Complete
- Guaranteed Lots – shows only Guaranteed Lots
- Conformed Lots – shows only Conformed Lots
- NCR Value – the same as the Value view, but filtered to only show lots with NCRs