Forecasts allow the project team to maintain an estimate of the profitability and cashflow of a project from the current time until its projected completion. Most of the information required to generate a forecast and projected cashflow is calculated automatically by Civil Pro from your daily costs and progress claims, so a complete forecast can be created in as little as 5 minutes. If you want to go further and provide more detailed information – such as cost-to-completion estimates for individual cost codes, Civil Pro supports this too.
The Forecast has been introduced in Version 9 and is accessed from the Cost Management section of the Main Menu – Cost management => Forecasts.
Each forecast in Civil Pro is recorded against a reporting period so it can be automatically calculate revenue, budget and cost from the Progress Claims and Daycosts for the current and previous periods. For more on reporting periods, refer to Cost Management Concepts – Reporting Period.
Contents
Forecast register
Adding, updating and deleting forecasts
Adding forecasts
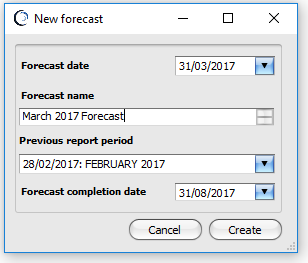
To add a new forecast, double click on the report period in the forecast register – the new forecast form will be shown. Enter the required information and click create. A new forecast will be created, and the forecast detail page opened.
- Forecast date – the date separating actual data of progress claims and daycosts from forecast data. Usually the same date as the end of the current reporting period
- Forecast name – a descriptor for the forecast, used on reports
- Previous report period – the report period prior to this one – used for extracting any previous forecast information (such as cashflow timing, cost estimates and budget revisions) for copying to the new forecast.
- Forecast completion date – the default date for the end of the forecast. Used in preparing cashflows
Updating forecasts
To view or update a forecast, double click its reporting period in the forecast register, or select Open forecast from the context menu.
Deleting forecasts
To delete the forecast for a reporting period, select the Remove Forecast function from the Foreccast register.
Introduction to the forecast detail
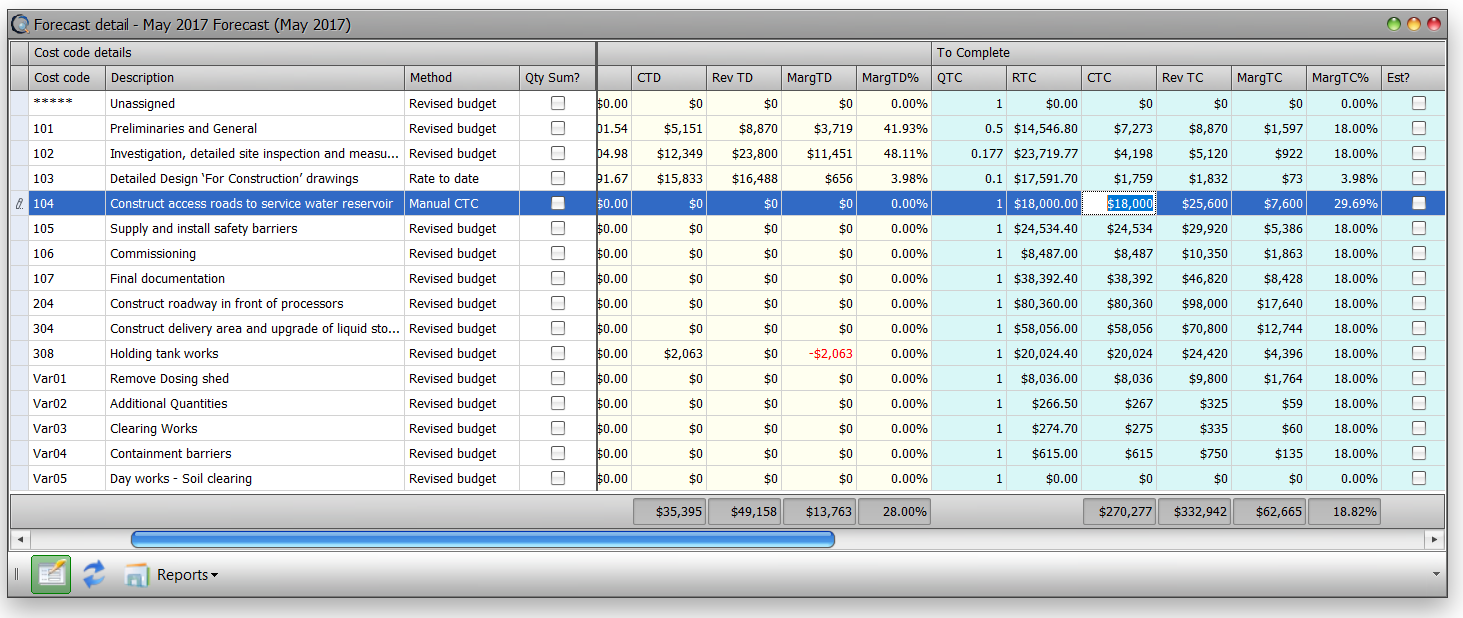
Once you have created your forecast, it will be opened in the forecast detail page. You can return to the forecast detail page later by double clicking a report period in the register. The forecast will show a row for each costcode in your project, with an additional row for unassigned items (more on that later).
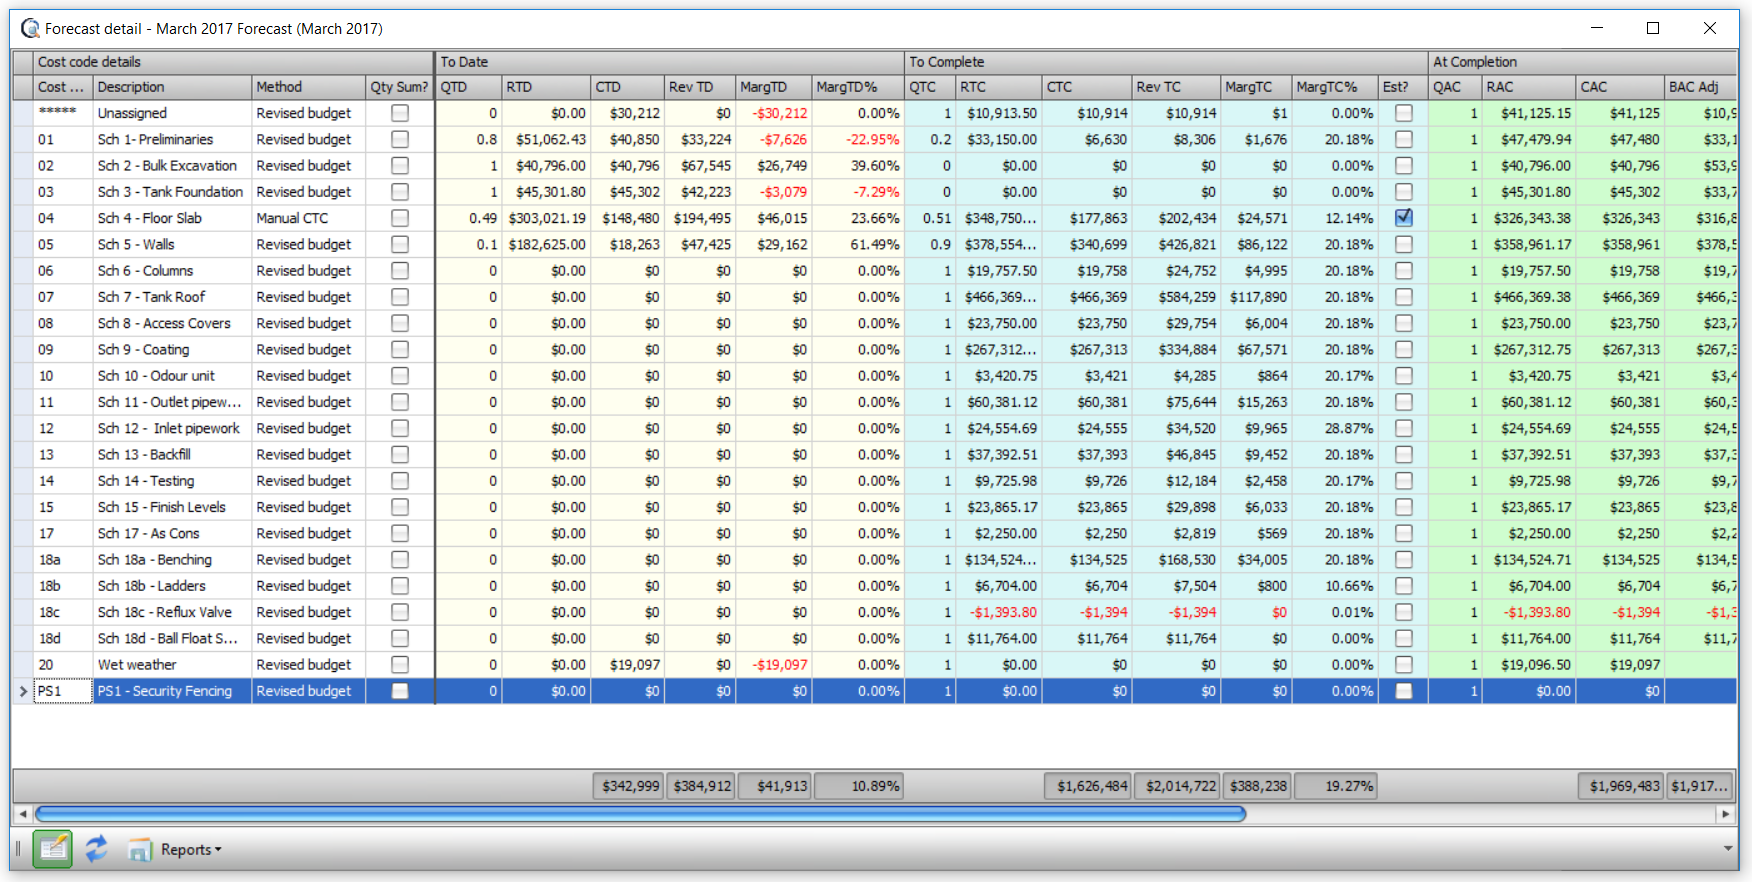
The forecast page is larger than is shown in the screenshot as it scrolls to the right. It is divided into four sections or ‘bands’
- Costcode details (white) – the headers for each row defining the cost code, and how the cost to complete is calculated
- Cost, budget and revenue to date (beige)
- Cost, budget and revenue to complete (blue)
- Cost, budget and revenue at completion (green)
How it is all calculated
This topic is pretty dry, but an understanding of how your forecast is calculated is essential to developing accurate estimates so please persevere. We will make it as painless as we can.
The information required for your forecast is limited to the following:
- The cost to complete each cost code
- The timing of revenue and cost to complete
Note that there is absolutely no estimation of revenue in the forecast. This is because it is already known. The revenue to complete is simply the difference between the at completion value of the project (as specified and update using the Quantity At Completion in each claim) and the claim to date for the period. It is the cost which is variable.
The data source for information in the forecast/reporting module is shown in the table below. As you can see, it is only the information in red – the cost to complete – which requires adjustment to calculate everything through to the variance and profit margin. Add some basic information to this, and we get the cashflow as well!
It is VERY important to understand the relationship between the schedule and costcodes as this is how Civil Pro automatically calculates your revenue and budget to date, to complete and at completion. For this reason, this topic its own section below.
Cost Codes and Revenue
Civil Pro calculates its budget and revenue for each cost code by summing the schedule items that are allocated to it, and factoring by the percent of the schedule item in that allocation.
For example;
CC Revenue To Date = ![]() (SIAlloc * PeriodQTD * SellRate) for all related schedule items
(SIAlloc * PeriodQTD * SellRate) for all related schedule items
CC Budget To Date = ![]() (SIAlloc * (PeriodClaimQty-PeriodOverclaim) * DJCRate) for all related schedule items
(SIAlloc * (PeriodClaimQty-PeriodOverclaim) * DJCRate) for all related schedule items
- SIAlloc => the percentage of each related schedule item
- PeriodQTD=> the quantity to date for related schedule items in the current period. The certified quantity is used if there are any certified quantities in the claim. Otherwise the claim qty is used.
- PeriodClaimQty => the claimed qty for the current period
- PeriodOverclaim => the under/over claim qty for the current period
- SellRate => the schedule item sell rate.
- DJCRate => the budget rate for each schedule item
The calculations for Revenue At Completion and Budget At Completion are similar
CC Revenue At Completion = ![]() (SIAlloc * PeriodQAC* SellRate) for all related schedule items
(SIAlloc * PeriodQAC* SellRate) for all related schedule items
CC Budget At Completion = ![]() (SIAlloc * PeriodQAC * DJCRate) for all related schedule items
(SIAlloc * PeriodQAC * DJCRate) for all related schedule items
- PeriodQAC=> the quantity at completion as specified in the progress claim for the period.
- SellRate => the sschedule item sell rate.
- DJCRate => the budget rate for each schedule item
Cost code distribution example
For example, take the two following schedule items;
For the sake of the example, there are no other schedule items contributing to CC201 or CC205. The calculations for CC 201 are;
RevTD (Revenue to date) = ( $650 * 10 * 40% + $600 * 20 * 35% ) => $6,800
BTD (Budget to date) = ( $550 * 10 * 40% + $500 * (20 – 5) * 35% ) => $4,825
RevAC (Revenue at completion) = ( $650 * 60 * 40% + $600 * 50 * 35% ) => $26,100
BAC (Budget at completion) = ( $550 * 60 * 40% + $500 * 50 * 35% ) => $21,950
RevTC (Revenue to complete) = RevAC – RevTD = $26,100-$6,800 => $19,300
BTC (Budget to complete) = BAC – BTD = $21,950-$4,825 => $17,125
Unallocated costs and revenue
Where a cost is not assigned to a cost code, or a schedule item does not distribute its revenue through a cost code allocation, these values are lumped into a single ‘unassigned’ cost code. Try to avoid this wherever possible as it is of limited functional use in determining the profitability of your project. It should be used only ass a bucket for low risk/value trivial items, or as a prompt that some records need to be updated with an allocation.
Completing a forecast
After all of the heavy formula stuff, lets return to the forecast detail page above.
You should by now understand that nearly all of the work we will be doing in our forecast will be in developing the cost to complete. There are three ways the cost to complete can be calculated on a cost code by cost code basis – the first two are even automatic and require no manual cost to complete calculations!
- Revised budget – Automatically calculates the cost to complete by assuming the remaining work will be completed on budget
- Rate to date – Automatically calculates the cost to complete by assuming the remaining work will be completed at the same rate as any work completed so far
- Manual CTC – The cost to complete is specified by either;
- Directly entering the expected cost to complete for the cost code; or
- Creating a buildup of the cost
Updating Unassigned Amounts
The forecast detail screen will show a row for each cost code in your project, with an additional row at the very top for unassigned items (see image above). Where a cost is not assigned to a cost code, or a schedule item does not distribute its revenue through a cost code allocation, these values are lumped into a single ‘unallocated’ cost code. Try to avoid this wherever possible as it is of limited functional use in determining the profitability of your project. It should be used only as a bucket for low risk/value trivial items, or as a prompt that some records need to be updated with an allocation .
To update these unassigned items you must go back into the Daycost Register. In the relevant daycosts reporting period find the item/s that do not have a cost code and using the drop down allocated one.
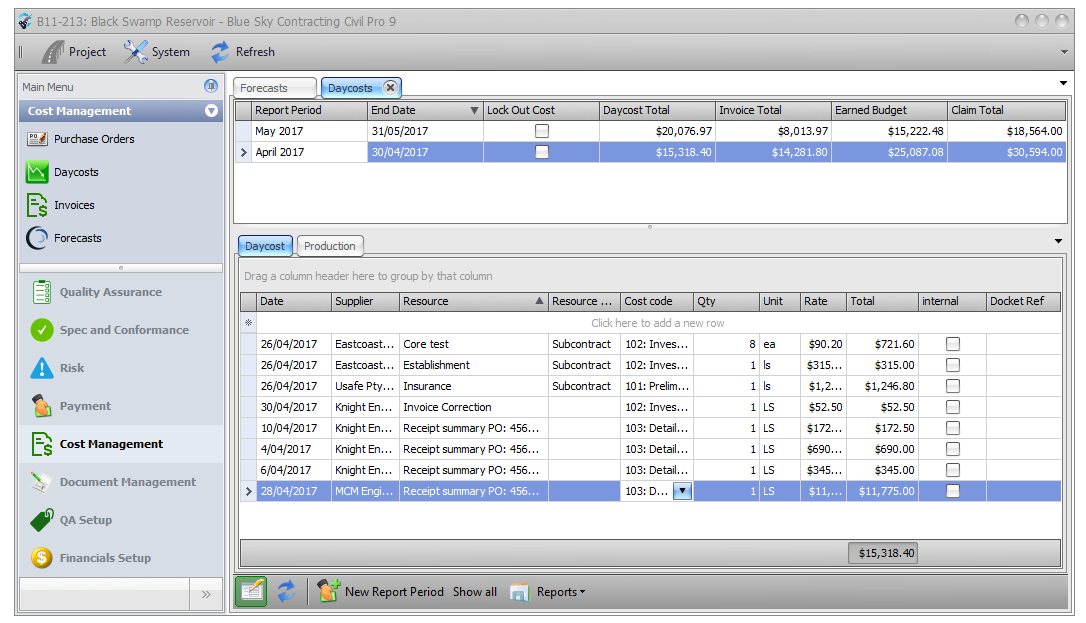
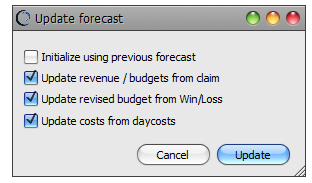
After this is done return to your forecast and select Update Forecast Data from the context menu. Then click Update from the Update Forecast dialog.
You will be bought back to the forecast detail screen and you will see now that the Unassigned line item at the top of the grid now has $0 in all the cells. This is because any amounts that were in there have now been assigned and transferred to the correct cost code.
Changing the Rate to Date Method
To change the method of CTC calculation, simply change the value of the Method column for the relevant cost code. In the screenshot above (click the image to enlarge), you can see that every cost code except Sch 4 is calculated to be completed at the budget rate. Cost code Sch 4 has a manual cost to complete.
Specifying a cost to complete
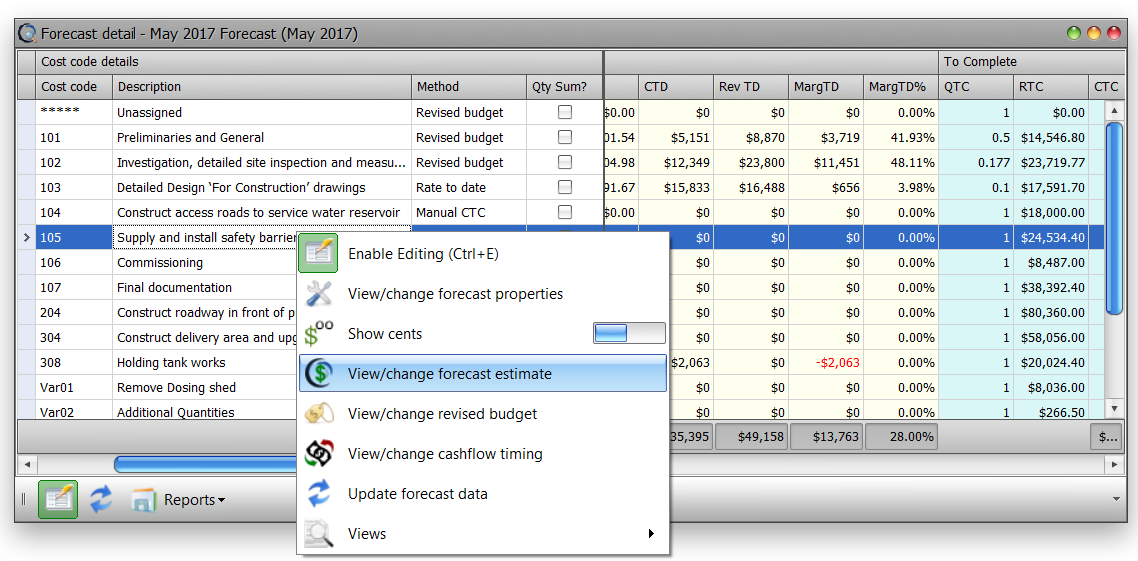
To view or update a cost to complete, double click on the cost code or select view/change cost estimate from the context menu.
As mentioned above, a cost to complete can be manually assigned by directly entering a number for the cost code in the cost to complete column (or the RTC – rate to complete column). More commonly, you would develop the cost to complete through a basic estimate. Sch 04 has had its CTC calculated from an estimate. This can be determined by looking at the checkbox in the CTC section (the column with the heading Est?).
Manually forecast with a detailed cost buildup
To create a buildup for a cost code’s CTC (cost to complete), you can just double click it, or select the view/change forecast estimate function from the context menu.
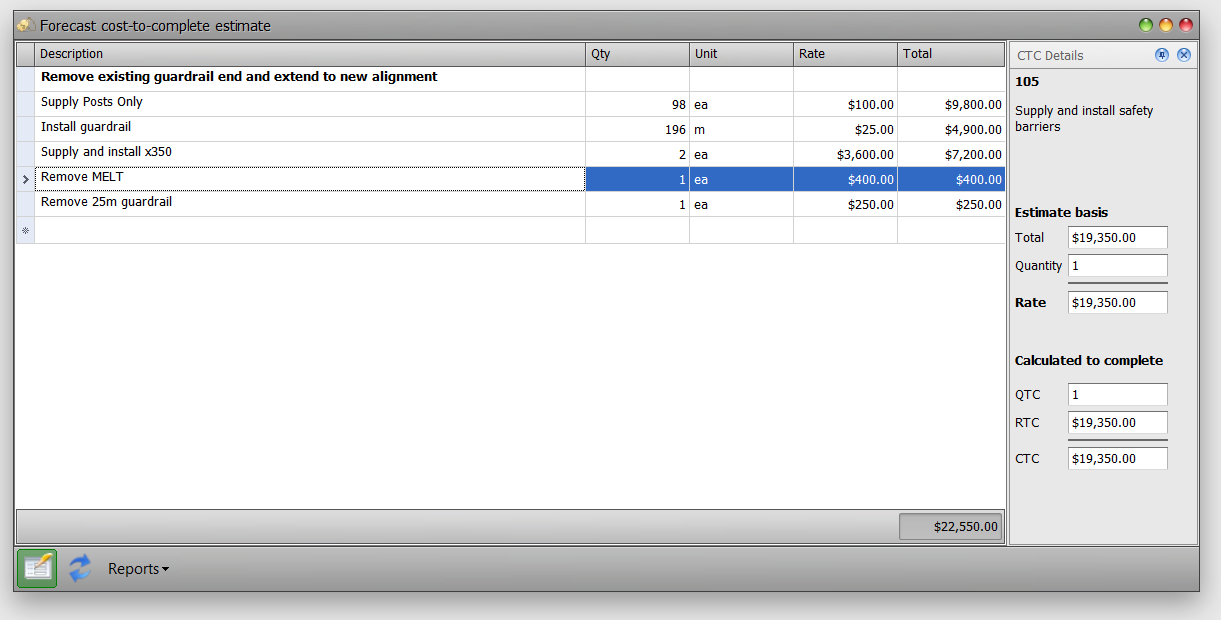
Enter the detail of your buildup (see example image below). The forecast cost to complete will be updated to reflect the total of the estimate. You will be prompted to change the forecast method to Manual Cost to Complete.
Updating cost code start & end date for cashflow forecasts
In addition to forecasting the final position of the project, Civil Pro can create a cashflow. In order to generate the expected cashflow over the life of the project you need to update the start and end date of each cost code. To do this select View/Change Cashflow Timing from the context menu. This will bring up the report details screen where you can edit the Start Date and End Date columns.

Forecast reports & cashflow charts
To generate forecast reports select report type from the Reports drop down at the bottom of the screen. To generate a forecast chart (like that in the image below), select the Forecast Cashflow Chart option.
